

Hi All,
I recently picked up a hard top, sides with windows and lift gate.
I am in the midst of sanding, priming and repainting the roof. I have decided to paint the entire assembly white. The reason I'm doing this is that this way I can do it myself (spray bombs).
I would like to actually use proper Land Rover colors, however other than having them mixed up for me, but don't know where I can get some "real" LR spray bombs. I see them advertised on Rovers North, but don't believe they will ship paint.
My options are $40. per bomb at Lordco, or $550. for a gallon of proper Land Rover colors mixed up by White & Peters here in North Van. that I would need to use a compressor and gun.
Any one know where I can get some LR Spray (colors = Limestone and Deep Bronze Green)?
Cheers,
Dave_F
P.S. Should I go Gloss or Semi?
Land Rover Paint
-
Dave_F
- Washed Up
- Posts: 694
- Joined: Wed Nov 14, 2007 10:39 pm
- Location: Deep Cove, N.Van
- Contact:
-
gudjeon
Howdy Dave,
You can find paint codes here for DuPont:
http://www.landrover.net/paint/
I had mine mixed by Napa for about half the price. It was in Centauri Enamel. Has the reducer and hardener mixed in after. I went for the gloss paint that did not require a clear coat. Shiney at first, but calms down after a couple of years of honest use. I hate doing bodywork, but after all that effort, I opted for the respray with compressor and paint gun. Spray bombs may work, but you'll need a lot of them and it is hard to get consistent coverage. Not an issue if one isn't too picky.
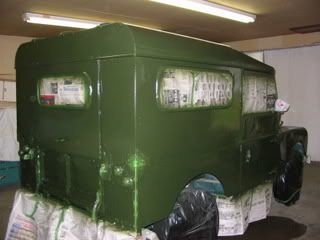
The results of fresh Bronze Green is worth it alone:
http://i35.photobucket.com/albums/d187/ ... s05062.jpg[/img]
You can find paint codes here for DuPont:
http://www.landrover.net/paint/
I had mine mixed by Napa for about half the price. It was in Centauri Enamel. Has the reducer and hardener mixed in after. I went for the gloss paint that did not require a clear coat. Shiney at first, but calms down after a couple of years of honest use. I hate doing bodywork, but after all that effort, I opted for the respray with compressor and paint gun. Spray bombs may work, but you'll need a lot of them and it is hard to get consistent coverage. Not an issue if one isn't too picky.
The results of fresh Bronze Green is worth it alone:
http://i35.photobucket.com/albums/d187/ ... s05062.jpg[/img]
-
Dave_F
- Washed Up
- Posts: 694
- Joined: Wed Nov 14, 2007 10:39 pm
- Location: Deep Cove, N.Van
- Contact:
Did you spray this yourself? I've only done this once before on a monza many, many years ago.
When you say the other ingrediants were mixed in after, did you mix them in or did Napa do it?
Your truck looks great, did you do the whole truck including the galvanized bits, or were these masked off...can't tell in the picture.
I think I'll finish the hard top with the bombs, and then after I finish the body work I'll spray the whole truck.
Thanks for the advice.
-
Bill E.
- Landy Man
- Posts: 933
- Joined: Wed Mar 03, 2004 12:30 pm
- Location: Tsawwassen BC
Hi Dave,
If your hung up on getting an actual Land-Rover colour then you might as well just get the paint mixed and do it with a real paint gun or have it done for you. I opted for the spray bomb and tremclad stock colours. If your going to scratch it in the bush the spray bomb job takes some of the sting out of the damage, plus it makes touch up easy. Good prep and a steady hand can give an acceptable finish. Tremclad "recreational white" is a pretty good fake for the official Land-Rover variant IMHO
Bill
PS Nice paint job Gudgeon, nice shop too.
-
gudjeon
Dave,
I sprayed it myself. The hardener and reducer gets mixed right as you put it in the paint pot for the spray gun. You do this yourself. It activates things so they set up and dry after being coated. The hardener comes in different strengths depending on temperature of spraying conditions. I sprayed this in my shop without heat (no explosions wanted or necessary) with it still snowing outside March of 3 years ago. An old Sanborn compressor and a tired paint gun that we have always used. Set up comp. outside and ice pack on the watertrap to collect any moisture in the lines. I did the primer in bombs because my work was a lot of start and stop at the time. Industrial Zinc Chromate on the bare ally, then grey Autopro primer (Napa).
I masked all the galvy. This took longer to do this than spraying! The bodywork was in good shape so I opted for leaving it on for painting. I know the die hard restoration is to remove it before painting :roll: . My advice is to practice and get the setting right on the spray gun, take your time, work from the top down, wet the floor to minimize dust, and allow for a day to do it so you don't have to rush. Oh yes, got a good charcoal-filter respirator.
I used a bit less than 3 quarts of paint on my 88". I have some left over for touch ups. My bodywork is not perfect so I'm not too worried about minor scratching when I take it out. I will let it get its natural patina over the next 50 years :lol:
-
DaveB
- Defender of the World
- Posts: 1749
- Joined: Mon Feb 09, 2004 7:45 pm
- Location: Vernon, BC
-
nakedbarra
- Mud Pit Boss
- Posts: 348
- Joined: Fri Mar 26, 2004 12:10 pm
hmmmmm
Its not as hard as it looks as its 90% in the prep work and this is a little paint job I did on one of my cars in the land of Aust . and I still have my gear.
http://i42.photobucket.com/albums/e321/ ... img021.jpg
Andrew
Sorry for the grainy pic
http://i42.photobucket.com/albums/e321/ ... img021.jpg
Andrew
Sorry for the grainy pic
-
Dave_F
- Washed Up
- Posts: 694
- Joined: Wed Nov 14, 2007 10:39 pm
- Location: Deep Cove, N.Van
- Contact:
Thanks for all the info and encouragment guys. :D
I sprayed the sides white with the Bombs, sanded and etch primed the roof...and I think that I will wait and use a comressor with a gun,after I prep the rest of the body and do the whole truck (including the sides again).
All in all it looks 110% better than the previous multy coloured h/top, even with the white sides and grey roof...at least it's clean...a little bright though.
Before
http://www3.telus.net/shade/Rover/DSC_0139x.jpg (alt+p)
After
http://www3.telus.net/shade/Rover/DSC_0162x.jpg (alt+p)
-
John
- Cylinder bore
- Posts: 469
- Joined: Tue Mar 23, 2004 8:37 pm
- Location: Langley, BC
Painting on a budget - no sprayer required.
http://board.moparts.org/ubbthreads/sho ... 682&page=0
After you have read the first 43 pages :shock: of this thread it continues in another thread!
http://board.moparts.org/ubbthreads/sho ... 682&page=0
After you have read the first 43 pages :shock: of this thread it continues in another thread!
-
bclandrover
- Out of Africa
- Posts: 401
- Joined: Wed Feb 25, 2004 11:21 pm
- Location: North Vancouver
- Contact:
The paitn cans Landrover sells are small and meant for touch up only. If you are goint to paint the whole thing, your best off to get the proper stuff mixed up.
Here is a link to our very own technical section on painting, in case you haven't read it yet!!
http://www.roverlanders.bc.ca/faq/LRpaintMain.html
Looks shinny! 8) 8)
Later,
Don
Here is a link to our very own technical section on painting, in case you haven't read it yet!!
http://www.roverlanders.bc.ca/faq/LRpaintMain.html
Looks shinny! 8) 8)
Later,
Don
-
Dave_F
- Washed Up
- Posts: 694
- Joined: Wed Nov 14, 2007 10:39 pm
- Location: Deep Cove, N.Van
- Contact: