Page 1 of 1
1960 SII 109 Teardown
Posted: Sat Jun 14, 2014 11:56 pm
by oldgravy
Made some serious progress getting to the SII this weekend. Managed to get the wings, cab, floor, and seat box all out along with the fuel tank. Drained about 20L of some brownish looking fluid that smelled like turpentine out of it.
Found some interesting things.
There are some ugly frame patches. Here:
http://imgur.com/Ahz7NFi.jpg
... and here:
http://imgur.com/P5jzxDX.jpg
Also discovered these:
http://imgur.com/NbAiPjN.jpg
Because why not? One thing does confuse me though, and that's this exhaust manifold + exhaust arrangement:
http://imgur.com/BKRnVwl.jpg
Notice my dipstick all bent out of shape by the exhaust downpipe.
Re: 1960 SII 109 Teardown
Posted: Sun Jun 15, 2014 8:53 am
by TOLON
I believe that gooseneck exhaust is standard on a 1960 SII but can be replaced with the later manifold that routes straight down between the block and the frame.
That mini coilover conversion is interesting...
Re: 1960 SII 109 Teardown
Posted: Mon Jun 16, 2014 12:31 am
by oldgravy
TOLON wrote:I believe that gooseneck exhaust is standard on a 1960 SII but can be replaced with the later manifold that routes straight down between the block and the frame.
That mini coilover conversion is interesting...
The problem with the "gooseneck" exhaust is that it's right on top of the dipstick. In fact, they rub. Mind you, the pipe doesn't appear to be original as it also rubs on the frame further down.
I have no idea what those coilovers are for, or from. Could be from a trailer or a golf cart for all I know. They don't appear to fit all that well as there's a bend / bind in one of the springs.
... the mysteries continue!
Re: 1960 SII 109 Teardown
Posted: Mon Jun 16, 2014 11:51 am
by oldgravy
The bulkhead looks okay except for some welded-in patches.
Front wing off:
http://i.imgur.com/TioVALw.jpg
A closer look at the patch on the passenger's side:
http://i.imgur.com/0pr2DgD.jpg
But the driver's side is worse, sadly. Inside:
http://i.imgur.com/XgjYPSD.jpg
and outside:
http://i.imgur.com/b949FQc.jpg
I pulled the rotted wire for the headlight dip switch through what looks like bathroom caulk or silicone or something. Not sure how much metal is there, but probably less than I hope.
Re: 1960 SII 109 Teardown
Posted: Mon Jun 16, 2014 1:02 pm
by DrRangelove
Interesting choice in colour by the PO - must have had a special on "safety Yellow" down at Lordco back in the day!
Are those servo assist breaks you have there?
Re: 1960 SII 109 Teardown
Posted: Mon Jun 16, 2014 5:43 pm
by oldgravy
DrRangelove wrote:Interesting choice in colour by the PO - must have had a special on "safety Yellow" down at Lordco back in the day!
Are those servo assist breaks you have there?
I believe it's house paint. :roll:
I don't *believe* there's a servo in the system, but as I'm still learning I'll likely 'follow my nose' like Toucan Sam and see if I can uncover a box of froot loops aka a brake booster!
Re: 1960 SII 109 Teardown
Posted: Mon Jun 16, 2014 7:22 pm
by sailourboy
My old 109 PU with a 6 cl had the same colour yellow throughout the truck
Cheers
Ted
Re: 1960 SII 109 Teardown
Posted: Tue Jun 17, 2014 5:07 pm
by oldgravy
sailourboy wrote:My old 109 PU with a 6 cl had the same colour yellow throughout the truck
Cool. The original colour was yellow as well but it had a bit more orange in it, I think, and I quite like it. Might be nice to go back to that, budget depending!
Re: 1960 SII 109 Teardown
Posted: Wed Jun 18, 2014 9:24 am
by Gromit Dog
Those coil overs were common about 40 odd years ago. an aftermarket "towing" thing usually found on big sedans and wagons.. in the back... interesting application though :)
Re: 1960 SII 109 Teardown
Posted: Thu Jun 19, 2014 3:58 pm
by oldgravy
Gromit Dog wrote:Those coil overs were common about 40 odd years ago. an aftermarket "towing" thing usually found on big sedans and wagons.. in the back... interesting application though :)
I'm led to understand the truck used to be a prospecting vehicle. It would get a lift on a trailer then was likely used to carry rocks, I guess. The bed of the pickup is pretty well-used so I suspect she's seen some weight.
Re: 1960 SII 109 Teardown
Posted: Wed Aug 13, 2014 11:25 am
by oldgravy
Took another poke around this past weekend; not getting up to the Okanagan as much as I'd like, so work on the truck is slow.
Pulled some grotty wiring out of a junction box and started to photo document some of the wiring behind the panel. It's a mishmash of house wiring, some original, and some 'repaired' stuff from a PO.
Decided to go with a complete loom which I'll have to pick up from RN or Autosparks or something. Any recommendations?
Plan so far is to continue to take things off down to the frame, get the frame patched and repainted, then start rebuilding. I'm not sure it'll be as nice as most other restorations, but I'm certainly looking for a functional rebuild.
Might consider having a scallop cut in the front x-member to accommodate a potential future transmission / TDI engine upgrade. We'll see!
Re: 1960 SII 109 Teardown
Posted: Wed Aug 13, 2014 11:30 am
by Dave_F
Go with Autosparks....got mine from them, great service and product.
You may need to change out some of the connectors but other than that spot on.....
Re: 1960 SII 109 Teardown
Posted: Mon Feb 29, 2016 6:42 pm
by oldgravy
Update time!
The truck has been moved here to the lower mainland now and sat in my garage for a couple of months. Currently in between jobs which has afforded me some time to tinker.
Stripped a bunch of stuff off the bulkhead and I'm discovering quite a few problems. Fortunately, *knocks on wood* most of the bolts have come out without too much trouble.
Current status:
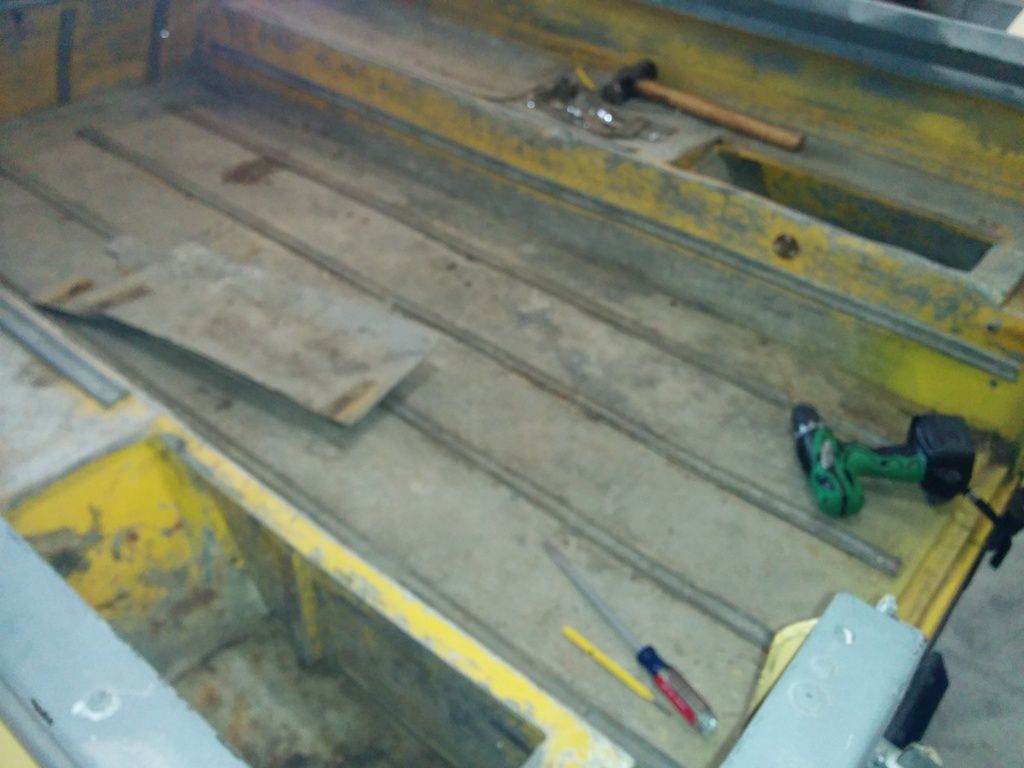
http://i1377.photobucket.com/albums/ah4 ... cpal0q.jpg
I broke three drill bits getting the bent, rent toolbox cover flaps off. The rear tub looks heavily used and is collapsed down the right side. I don't know if it's salvageable. It's definitely not straight.
http://i1377.photobucket.com/albums/ah4 ... mfbofv.jpg
The rear bumper is totally shot. I knew it was bad, but not quite this bad. I don't think it's a whole bumper. I think someone fabricated the left side as it's missing the bracket to bolt to the rear tub. The right side is bent and crushed. It's rusted through in the frame as well. :(
http://i1377.photobucket.com/albums/ah4 ... ku5217.jpg
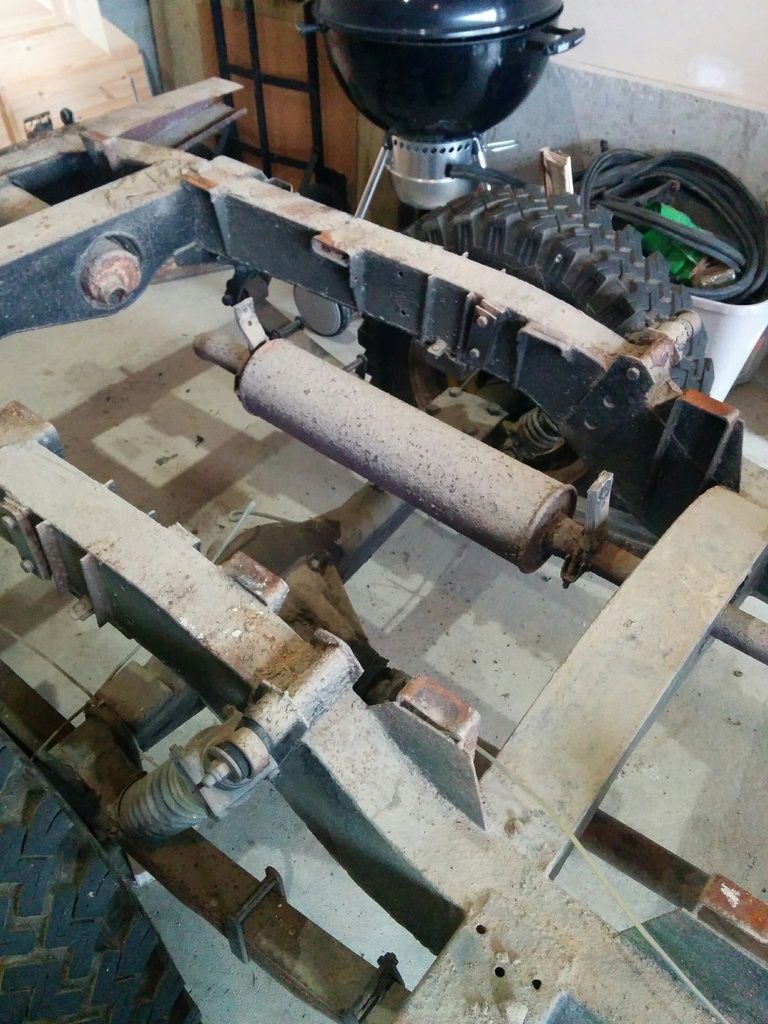
The frame around the spring hangers doesn't look too bad though, but I'll definitely have to dig in there more. I suspect the tube at the top of the shock mounting points (the part that goes over the frame) is toast. There's tons of corrosion and I don't know if the tubes are stout enough anymore.
http://i1377.photobucket.com/albums/ah4 ... dmuewi.jpg
I'm pleased with my progress, but somewhat chagrined at the scope of problem areas I'm discovering.
Re: 1960 SII 109 Teardown
Posted: Wed Mar 02, 2016 1:51 pm
by andrewMcF
Don't get discouraged!!! It's like eating an elephant, one bite at a time. Just sometimes the bits of the elephant comes backup and you have to do it over again... LOL
Re: 1960 SII 109 Teardown
Posted: Wed Mar 02, 2016 7:38 pm
by DrRangelove
As far as frames go you've got a goodun'! A little attention here and there and you'll be good for another 50 years of rot free rovering!
May i suggest doing a good thick coat of waxoyl on the frame before you put everything back together? I did the same with mine knowing therell be bits i will never get to again once the tub is on (top rails for example)
Re: 1960 SII 109 Teardown
Posted: Mon Mar 07, 2016 5:22 pm
by oldgravy
DrRangelove wrote:As far as frames go you've got a goodun'! A little attention here and there and you'll be good for another 50 years of rot free rovering!
One hopes! It will definitely need to make its way to a proper shop, though, for some TLC and repairs. Any recommendations for rover-friendly shops in the suburbs? It'll probably take me a while to get there, but it's nice to get an idea of what I'm looking at from a cost perspective.
DrRangelove wrote:May i suggest doing a good thick coat of waxoyl on the frame before you put everything back together? I did the same with mine knowing therell be bits i will never get to again once the tub is on (top rails for example)
Did I read in another thread that someone locally is doing... Dinitrol or something, supposed to be similar?
Took a hammer to some suspect-looking spots and it seems fairly good. Fingers crossed!
Next I'll have to drain all the fluids, finish stripping the bulkhead, and start removing bits and bobs like the rear propshaft (shot,) handbrake (looks OK,) front apron (looks good,) and so forth.
Re: 1960 SII 109 Teardown
Posted: Mon Mar 14, 2016 6:21 pm
by oldgravy
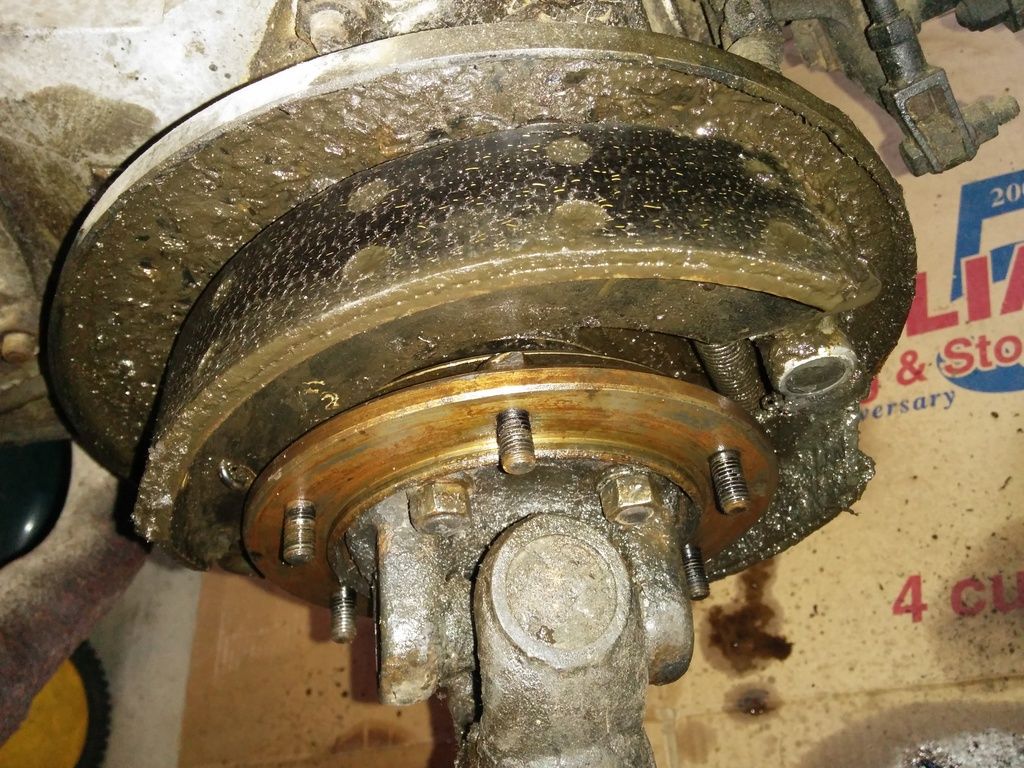
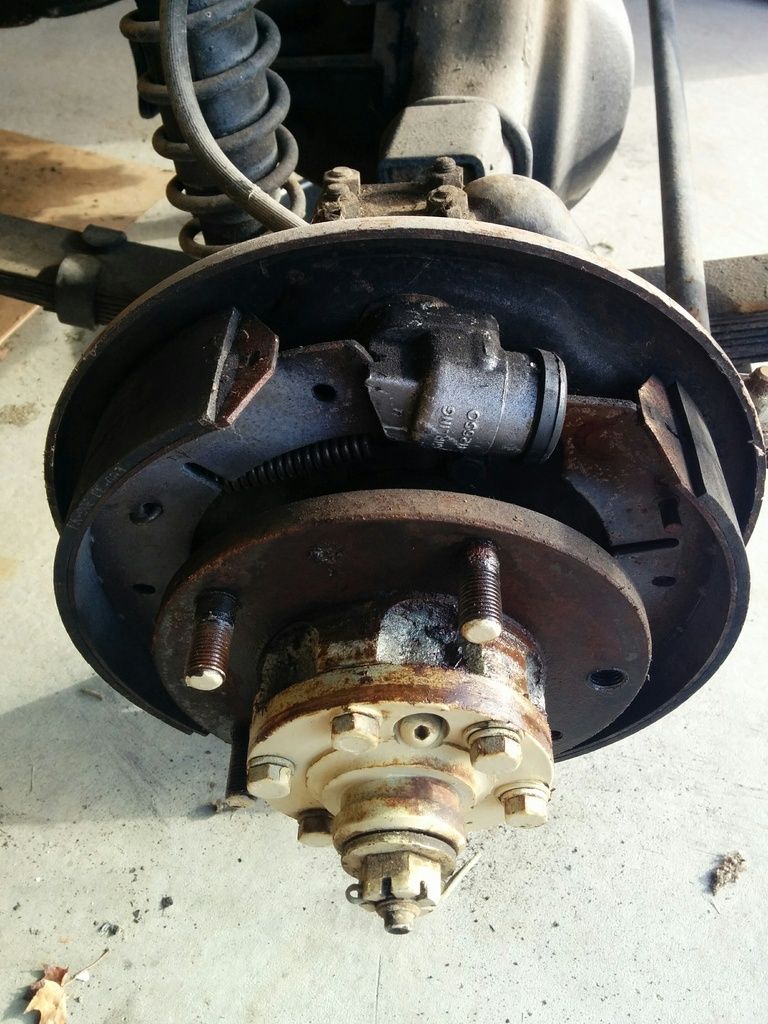
Attempted to remove the propshaft. Two of the propshaft nuts came off no problem, but the other two spun the bolts inside the drum, making an irritating process just a little more fun. So off came the drum.
I don't know much about vehicle repairs, or brakes in particular, but I'm pretty sure drum brakes aren't supposed to be dripping in greasy sludge.
http://i1377.photobucket.com/albums/ah4 ... eqpwnb.jpg
Getting the brake shoes out was a lot of trouble. I ended up prying the hell out of 'em with my biggest screwdriver. Those springs are strong! I levered the shoes up over the flange for the brake drum so I could get behind 'em and get the springs off. What a pain.
To do that I had to disassemble the handbrake linkage, which seems as though it was designed to be as complicated as possible.
http://i1377.photobucket.com/albums/ah4 ... y1xt91.jpg
But all is removed, now, and I can start taking off the flange. Or maybe I'll just forget it and work on the bulkhead instead. ;)
Re: 1960 SII 109 Teardown
Posted: Tue Mar 15, 2016 10:08 am
by DrRangelove
oldgravy wrote:
Did I read in another thread that someone locally is doing... Dinitrol or something, supposed to be similar?
I think one of the Rover shops in North Van is doing it... it's really not hard once the body is off the frame though - the access is obviously much better and you can get to all the holes on the top rail to actually get oil inside the frame. I just painted parafin based wax oil (Lordco) direct onto the frame with an old brush. It goes on nice and thick, and dries into a flexible, impenetrable layer if you do a couple of coats. If I was doing the frame on a running vehicle, I'd probably take it into a shop for convenience as it is a bit of a dirty job if you have the body on...
Re: 1960 SII 109 Teardown
Posted: Wed Mar 16, 2016 6:55 pm
by oldgravy
DrRangelove wrote:I think one of the Rover shops in North Van is doing it... it's really not hard once the body is off the frame though - the access is obviously much better and you can get to all the holes on the top rail to actually get oil inside the frame. I just painted parafin based wax oil (Lordco) direct onto the frame with an old brush. It goes on nice and thick, and dries into a flexible, impenetrable layer if you do a couple of coats. If I was doing the frame on a running vehicle, I'd probably take it into a shop for convenience as it is a bit of a dirty job if you have the body on...
The restoration I'm working on will be almost frame-off. The bulkhead will have to come off for footwell and tunnel cover repairs. I may take the engine out for a refurb and painting / cleanup as it was non-running when I bought it. Don't know what the problem is, but I suspect starter + spark are both issues.
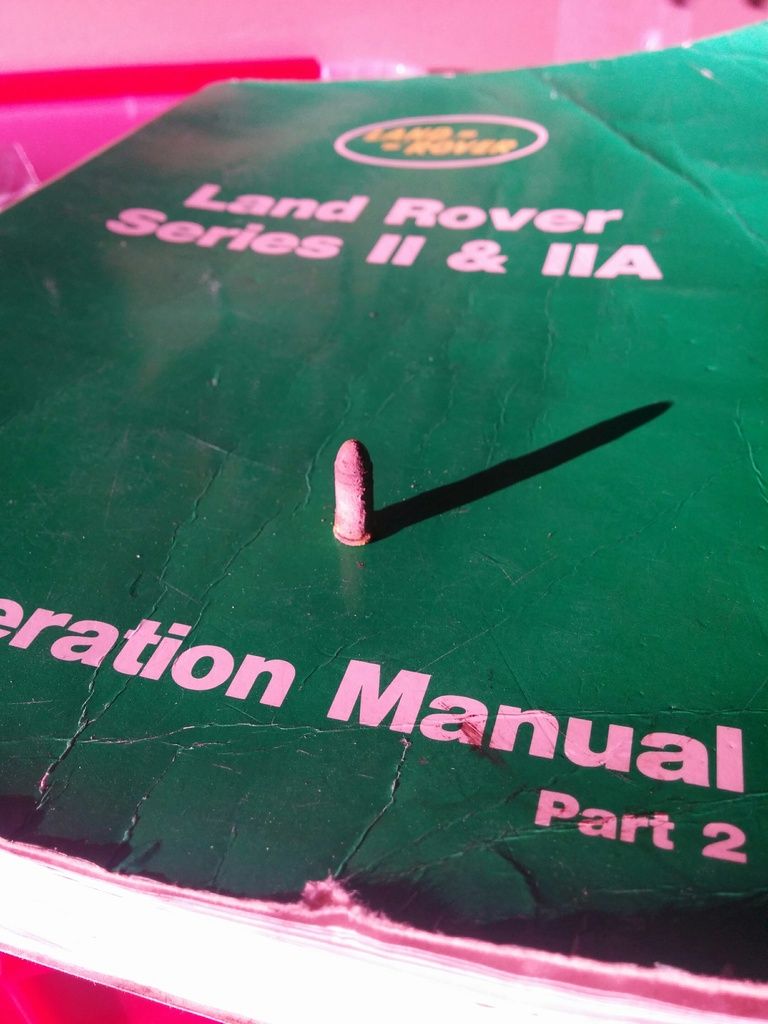
Today's work involved pulling more bits off the bulkhead, including finding this little gem (a .22 short round) wedged in the driver's side vent arrangement. Not sure why the photo is pink, it's possible my phone doesn't know that spring is here.
http://i1377.photobucket.com/albums/ah4 ... vjh01g.jpg
... and then I got a little sidetracked with a new problem.
First, the bulkhead continues to be stripped; all I have left are the pedals & cylinders, the throttle linkage, and a few lower-down bits and bobs -- then she should be ready to remove. I had decided in the past couple of days to roll the truck out of the garage for a hose down / clean out and rearrange my workspace now that I've pulled the tub off (single handedly, which was kind of dumb.) The truck has always been hard to roll around so I thought, what the hell, may as well check and see if something was stuck.
Sure enough, got both front wheels off the ground and both wheels barely turn, or at least not without great effort. So I cracked open my service manuals and decided to see if the brake adjusters just need fiddling. I backed both off on each wheel and I figure I must be doing something wrong, because now I can't turn the wheels at all. Surely the adjusters go counterclockwise until they stop, which is a few turns?
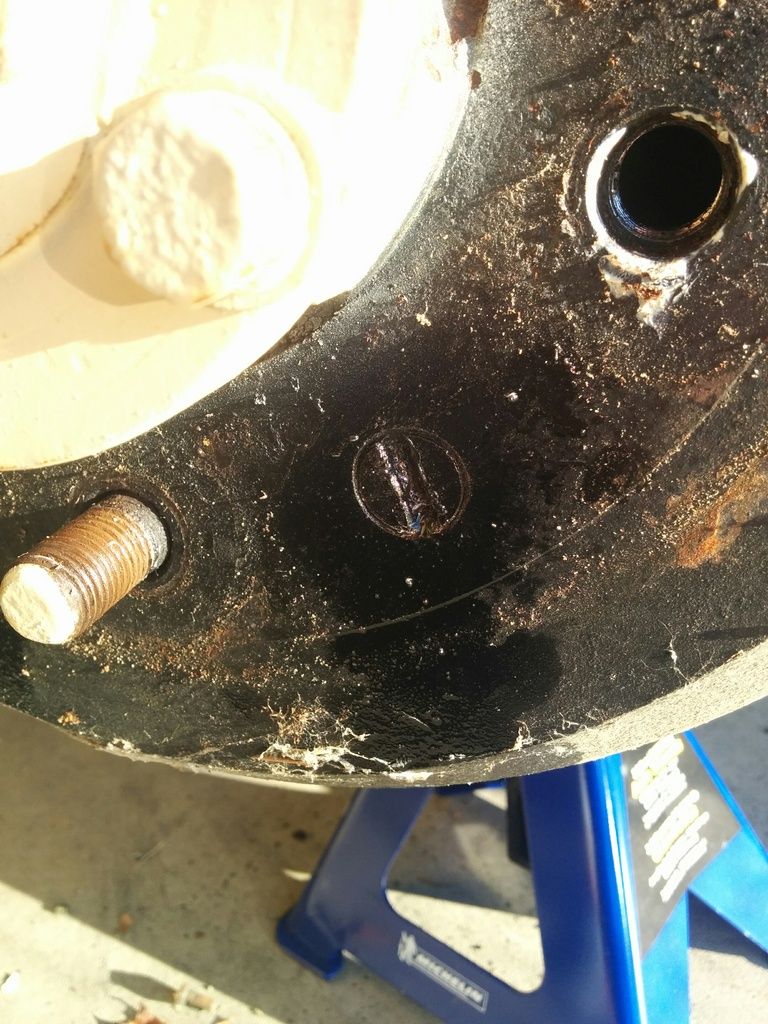
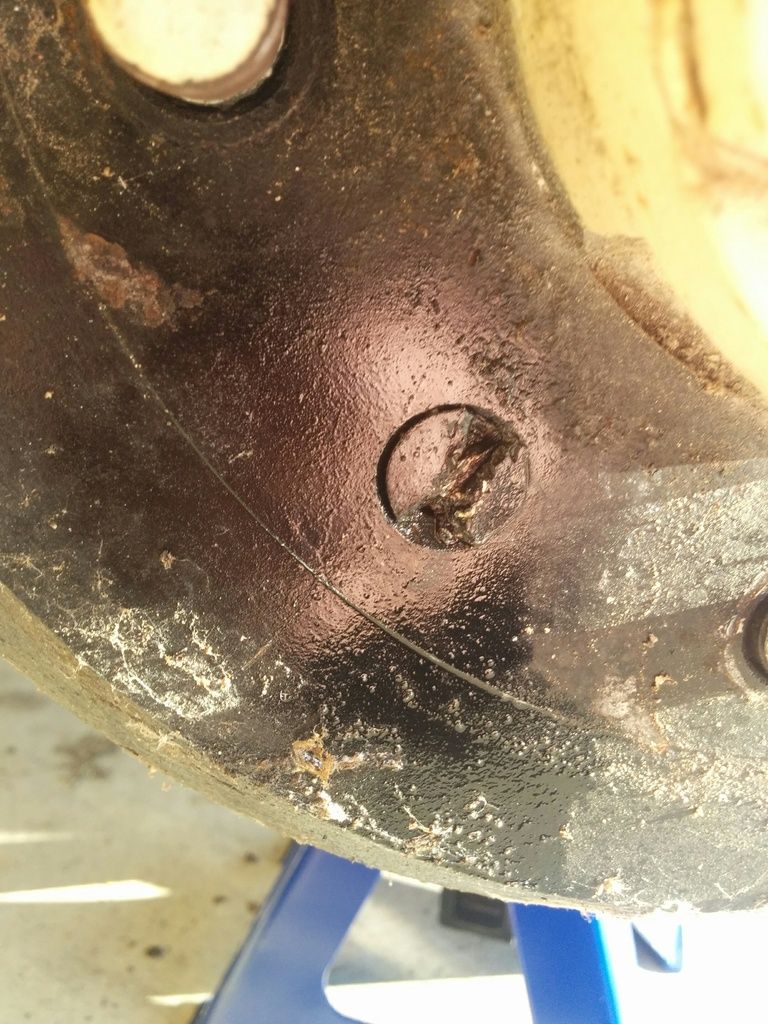
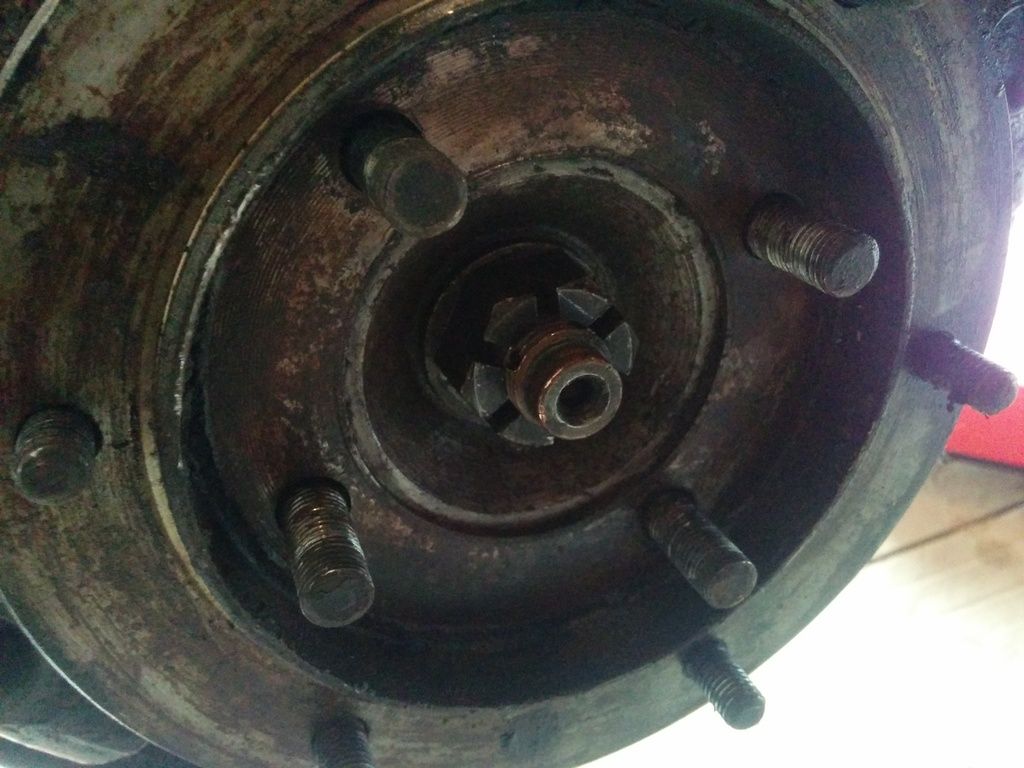
OK, thought I, I'll just pop the drums off and see what's what. Maybe I can drift them off or something! I pulled one of the wheels and found the two screws holding the drums on are stripped all to heck and look like someone tried to chisel them off. I'm not sure how I'm going to get around this problem.
http://i1377.photobucket.com/albums/ah4 ... skhwiu.jpg
and
http://i1377.photobucket.com/albums/ah4 ... o4infc.jpg
Part of me thinks, OK, maybe I'll just hit one edge of the bolt with a punch or something and see if I can get it to turn. Or, maybe I can just try and find something thick enough (that's what she said) to get some kind of purchase on the bolt head. I don't think I have the technology to drill the head off, and besides, where would that leave me? My only other idea is to drill small holes into the remaining bolt head face (if that's a term) and use some circlip pliers or similar to try and spin the bolt.
I don't even know if I can get the drum off even if I can get those bolts out. Hmm.
Interestingly, one of my wheel nuts came off with the thread stuck in it. Does that happen, sometimes?
http://i1377.photobucket.com/albums/ah4 ... rgpvqv.jpg
Re: 1960 SII 109 Teardown
Posted: Wed Mar 16, 2016 7:16 pm
by Rambler
Sorry to hear of the problems. I faced similar issues with some wheels not turning when pushing my S2 into the garage. Found that the springs had snapped so the shoes were jammed up against the drums. When trying to take said drums off to fix this my screws were in a similar state. I did luck out with a cheap impact driver (the kind for pounding in screws when you are too lazy to drill a hole) worked a treat. Just need a good quality bit and the impact motion does the hard stuff. Failing this you couod try an impact driver (the type you hit with a hammer). Good luck with things.
Re the stud coming away with the nut. Yep also happened to me. The older Series 2 and 2As had screw in studs that are peened over on the inside of the hub. Over enthusuastic garages will over torque your wheel nuts when swapping tyres. As a result this breaks the studs loose and these can fall out with dangerous consequences. I read that a good solution was to remove the hub. Drill or dremel out the original 9/16" hole slightly, and then to drive in from the rear a push in stud that are available in 9/16" or larger stud sizes. The only snag
I found with doing this was the new stud is shorter (no tapered hole on the back of the hub for this stud tail to sit in). I have replaced the original S2 double sided lug nut on this shorter stud with a single taper lug nut. I can dig out part numbers if this helps.
Cheers,
Ian
Re: 1960 SII 109 Teardown
Posted: Wed Mar 16, 2016 7:28 pm
by Rambler
One interesting thing I found re the tiny screws (part number 1510) that are all churned up, is the new ones come in 2 types. My 1961 early hubs accept the black screws and these go in flush. Sadly most part suppliers ship the silver screws to you and they are a little bigger - so wont go in flush with the brake drum surface. I bet the reason your screws are so mangled is that a previous owner tried with all their might to screw them in flush and failed turning the soft metal screws into a mess. I have ordered the screws from several parts suppliers and cannot find more of the black screws - they just ship the silver type that are too big and made of cheese (to quote someone on youtube talking about bp bolts!)
Re: 1960 SII 109 Teardown
Posted: Thu Mar 17, 2016 9:57 am
by DrRangelove
Those look pretty mangled mate... I had the same thing on mine. penetrating fluid, heat and patience will sort them out. Drilling out would be a last resort - hope it doesn't come to that!
Re: 1960 SII 109 Teardown
Posted: Thu Mar 17, 2016 2:50 pm
by oldgravy
Thanks, guys. Appreciate the tips & advice as always!
Bad news indeed if the hub is stripped / knackered. It might be best to get a newer one, depending upon its condition.
Looking again at the screws, it seems as though someone already thought of my idea of drilling in two holes to use to spin them out -- in one of the pictures you can almost make out two indents at either side of the bolt head. Hmm. Might have to run outside and see if I can get 'em off!
I'd prefer not to have to buy an impact driver, but I do need to buy a corded drill anyway to take off the rivets so perhaps I can justify the cost to upgrade to an impact capable version! :mrgreen:
Re: 1960 SII 109 Teardown
Posted: Mon Mar 28, 2016 10:48 am
by oldgravy
Victory was mine!
http://i1377.photobucket.com/albums/ah4 ... zikoab.jpg
Managed to get the screws out with a manual impact driver. Had to hit it pretty hard, but it worked! Then, the drums came off (boy, were they stuck) by putting the screws in the other threaded hole which pushes on the hub. Thereafter, a big pry bar levered against the backplates got them off. Nice!
Now I'm stuck here:
http://i1377.photobucket.com/albums/ah4 ... bw7ttz.jpg
This is the rear output flange off the t-case. The 1" castle nut on the thread in the centre of the photo is on there but good, and I'm having a hell of a time turning it. I've tried:
- Using the newly purchased impact driver: Nope.
- Bracing the transmission brake drum bolts against the concrete floor with a piece of 2x4 and turning on the nut with a socket and a breaker bar. This only lifted the rear of the chassis off the ground. Hmm.
I may have to heat it and try the breaker bar again, but the bolts are digging deeply into the wood so I may not be able to shift the nut.
Re: 1960 SII 109 Teardown
Posted: Mon Mar 28, 2016 3:33 pm
by John Boy
use a dill with a 1/8 bit, drill into each of the five slots toward the washer. then to a larger bit, do the same to all five slots. when the metal looks thin, use a chisel to snap the nut lose.
Then clean the threads and buy a new nut.
Cheers;
Johnny B
Re: 1960 SII 109 Teardown
Posted: Wed Mar 30, 2016 11:06 am
by oldgravy
Thanks for the tip, JB. I'll give it some thought, but I'm not confident I can drill cleanly enough to avoid marring the threads. Headed out to the garage now so hopefully some heat will help!
Re: 1960 SII 109 Teardown
Posted: Wed Mar 30, 2016 5:39 pm
by oldgravy
Heat did not help, unfortunately, and it felt like I was almost bending a 2' long breaker bar.
The t-case & transmission are still in the truck, and I sort of feel it'll be easiest to get this nut off so I can get the flange off while it's still in the frame. If I take the t-case out it'll have to be drilled as JB suggests, I fear. Any other genius ideas? Will ponder.
Re: 1960 SII 109 Teardown
Posted: Wed Mar 30, 2016 6:06 pm
by red90
A 3/4" drive impact. They do over 1200 lb-ft and nothing that size should stop one. Maybe you can borrow or rent. If you are using a 1/2" air impact, make sure to turn the air pressure up to the compressor's maximum and give it some time.
Re: 1960 SII 109 Teardown
Posted: Wed Mar 30, 2016 6:27 pm
by oldgravy
Success! Right after posting this update I got irritated with myself and went out to try again. My original thinking, in trying to take the blasted thing off, was that I shouldn't put any stress on the flange (via clamping or vice grips or whatever) and shouldn't put any stress on the gearbox or transfer case.
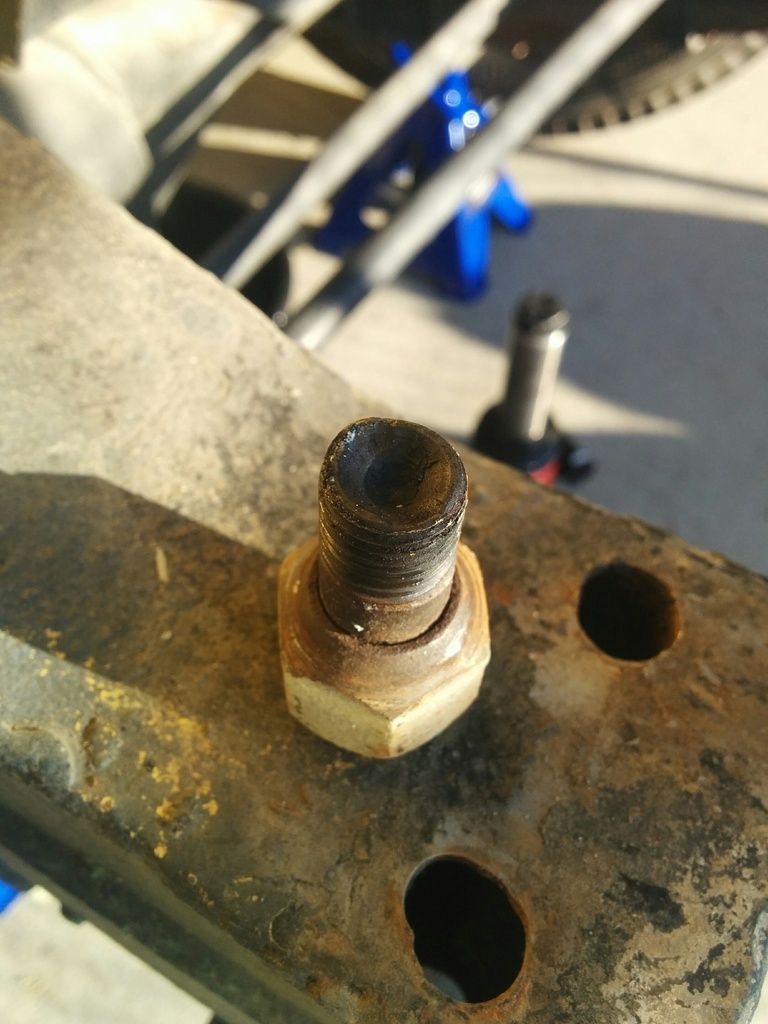
However, a quick read on the S2Club website suggested selecting two gears at once -- for a t-case that wasn't in situ -- so what the hell, I thought. Put 'er in gear and cranked with the bar. The engine turned over once or twice, but the nut finally loosened off, thankfully, and the flange is out! There is some damage to the thread on the shaft, but it should be easily cleaned up with a file.
http://i1377.photobucket.com/albums/ah4 ... gcrn9i.jpg
I can see why the brake drum and propshaft bolts were so irritating to remove, spinning inside the drum. The corners are well rounded! Those will have to come out.
What else did I do today? Took the radiator off and separated it from the steel front fascia. What a lovely, random collection of nuts and bolts! 3 different types, just for fun:
http://i1377.photobucket.com/albums/ah4 ... gwz4z8.jpg
The rust in the foreground is from the rear spring's front outrigger -- they seem to be full of mud and rust and look like they might need to be replaced, there's a fair bit of what used to be metal in there amongst the caked on mud.
Flushed out the radiator, too; seemed like there was about, I dunno, a third or a half of a cup of rusty flakes in the bottom of the rad when I drained it? Top bung looks like it was welded / epoxied on by someone with my level of skill:
http://i1377.photobucket.com/albums/ah4 ... lsa8wq.jpg
Are they always this... uhm, bush league?
Neat identification plates on the top, though. Was mine made in October of '59?
http://i1377.photobucket.com/albums/ah4 ... 2m3oez.jpg
Rolled the truck out as far into the driveway as I dared, realizing I'd have to push it back in to the garage single-handedly, so I could give the truck a hose down and clean out the garage behind. Glad I did, now I can see the frame a bit better now and 12+ years of dust, cobwebs, and wasp's nests are mostly gone.
I've cleaned out the occasional nut, the edible kind that is, as well. Field mice? Squirrels?
Current status:
http://i1377.photobucket.com/albums/ah4 ... tlzsmu.jpg
Pretty much everything aft of the transmission is out; bulkhead is about halfway stripped. Next to come off will be some of the ancillaries and the rest of the bulkhead, then it'll be time for an engine hoist to pull the engine, gearbox, and t-case for checkup. Then axles & suspension are all that's left and I should be down to a bare frame!
Edit: Thanks for the advice, Red, but I have no compressor -- I'm doing everything by hand.
Re: 1960 SII 109 Teardown
Posted: Thu Mar 31, 2016 10:51 pm
by oldgravy
This thread is turning into a bit of a daily blog, at least while I have some free time, so I hope no one minds the updates. I was really inspired by this blog
http://1960landroverrestoration.blogspot.ca so I thought I'd start recording my progress similarly.
Today's task was to clean off the workbench and put away some stuff, and reorganize the parts boxes I'm using to keep most of the assemblies in manageable (organized) chunks. I have a box for stuff I pulled off the bulkhead, things I stripped from the tub, front brake parts, etc. etc. Having never done this before I hope I've been thorough
enough with my organization -- we'll see when it comes time for reassembly. One thing I haven't done is kept track of the weird bolts / bits / trash that I've pulled out, figuring I'll probably have to order a great whack of bolts / nuts and every seal & gasket, etc.
So I pulled the pedal boxes off, with pedals; couldn't initially figure out how that was supposed to work, having assumed I'd pull the pedals out first
then the pedal boxes, but it seems that you have to pull the whole assembly out through the hole in the bulkhead.
As is the norm with this Rover, it seems like every fitting / screw / nut was a different size. I ran out of room to store wrenches when draining the brake fluid (which I did by unscrewing a really strange plug from the 4-way junction; more on that later.) Of course, the bolts holding the pedal boxes in were two different lengths:
http://i1377.photobucket.com/albums/ah4 ... oqcz48.jpg
I originally approached removing the pedal boxes the usual way, by getting a wrench + socket combo going to remove the nuts. However, the nuts on the top of the pedal boxes were a very odd size, and none of my wrenches fit (are they Whitworth or something?) Luckily, I was able to just ratchet the bolts out. Perhaps the pedal boxes have nuts that are tacked or epoxied on or something.
One of the bolts holding the brake cover plate in was odd. I've never seen a machine screw with a Robertson head before:
http://i1377.photobucket.com/albums/ah4 ... 4y2d2g.jpg
... at least, not an older one. I imagine they're common nowadays, perhaps this was added later. The bottom fluid pipe connector on the bean can was a b*tch to undo.
Also pulled the transmission brake backing plate off the transfer case:
http://i1377.photobucket.com/albums/ah4 ... j5tkzj.jpg
... and figured out why it was full of oil and gunk. Looks like the rear seal keeper plate -- or whatever it's called -- is bent in one place, and there was no gasket. Wasn't much fluid in the transfercase, either, when I drained it, so it's easy to guess where some of it went.
You can just see the bend in the foreground, and (naturally) one of the lock washers is different from the others.
http://i1377.photobucket.com/albums/ah4 ... c4pmdk.jpg
Honestly, I wonder how far I'll have to go into this project to find a set of nuts & bolts that don't have something unique about them. :mrgreen:
Re: 1960 SII 109 Teardown
Posted: Fri Apr 01, 2016 5:22 pm
by Rambler
No complaints here re the daily update. Finding this super interesting and helpful as I'm in the same boat. Re the fasteners. Initially I was ordering bolts from various land rover places via the part number, but then I learned that most parts in the parts book are fine thread bolts of ¼" or 5/16" in ½, ¾" and longer sizes. I found it good to go to a local bolt supply place and source these buying a 100 at a time with nuts and spring washers. Yes there will be some places where BSF or whitworth or some other will be required, but this has saved some time and money. And i feel better replacing those odd robinson or whatever nuts and screws that have been substituted over the years. The BA size of machine screws are getting hard to buy anyway, so I'm making do with SAE or in some cases metric. I.e. 3BA is 4.1mm so a 4mm screw works...
For the brake (and clutch) pedal towers Im just about to start the strip down. The top cover normally have flat / blade type of screw top, so think the PO swapped in that Robinson one.
Re the transmission brake and oil seal leak. Mine is also leaking. The oil catcher shield (shield that is bent in your photo) is not a proper Land rover item. (Pn: 561368). Well it looks different to the one I have and that was fitted to my last rover too. New ones are still available from the UK for a few quid.
Yes, The pedal boxes do have captive nuts to screw 6 x 5/16 unf bolts into them on each box.
Good luck with the Restoration. I am dissassembling / cleaning and then repainting my throttle assembly. It was murder trying to get it in bits. Hopefully
I took enough photos to help put it together again!
Cheers, Ian
Re: 1960 SII 109 Teardown
Posted: Fri Apr 01, 2016 9:06 pm
by DrRangelove
Keep it coming mate... loving this thread!
Re: 1960 SII 109 Teardown
Posted: Tue Apr 05, 2016 3:42 pm
by oldgravy
Thanks for the tips, @Rambler. I'll be doing a full bearing & seal replacement of the gearbox and transfer case, I think, just given the fact that I can't know whether or not the truck was working and what shape everything's in. Plus, if I'm pulling everything off the frame for a dip and repair, it makes sense to get to that kind of thing now while it's easier to do.
Today's challenge is trying to find a way to disassemble the steering components. There isn't much left to pull off, strictly speaking, save for a few hours stripping the bulkhead, removing flexi brake lines, and whatnot. The engine is more or less ready to come out (I think) and it's even made a bit easier because the PO forgot to put a couple of nuts back on the gearbox + engine mounts! He must surely have been thinking of me. :wink:
Anyway, my challenge is: How did you gentlemen remove the steering box drop arm? I've removed the 1 1/8" nut and lock washer, but splitting the arm off of the splined shaft is proving to be challenging. I don't have "Special Tool 600000" as cited in the manual which, in my imagination, is a Thor-sized hammer.
Seriously though, I'm guessing there's a right size of wedge that you simply hammer down over the shaft which splits the arm off? I can't see another way to remove the upper steering linkage without taking apart the bulkhead / steering support and associated fixing. Even then, I'll need some way to get the drop arm off. Probably. There's a fair bit of steering play in the box so I think it'll need a looksee.
Enjoyed using my angle grinder with a cut-off wheel for the first time to get the exhaust out. It had been fed through the PTO pass-through in the chassis cross-member so there was no way it was coming out without being cut. Have to say, grinding is more fun than I thought it'd be.
Re: 1960 SII 109 Teardown
Posted: Tue Apr 05, 2016 10:14 pm
by BOlson
What you need is a pitman arm puller,
http://www.harborfreight.com/media/cata ... _18336.jpg
Available at Princess auto, Lordco, Etc...
Re: 1960 SII 109 Teardown
Posted: Wed Apr 06, 2016 5:48 pm
by oldgravy
Yeah. I'm guessing there's no removing the steering box, then, without first removing the manifolds at least, or indeed the whole engine.
Re: 1960 SII 109 Teardown
Posted: Thu Apr 07, 2016 7:03 am
by red90
Correct. On a series, there is no using a pitman arm puller with the manifolds in place. Be careful when setting up the steering system. The manual does not do a very good job of explaining how to properly line up all the bits and people do it wrong frequently.
Re: 1960 SII 109 Teardown
Posted: Thu Apr 07, 2016 4:57 pm
by oldgravy
Thanks @red and @bolson. People do it wrong... how? It seems fairly straightforward and I've taken a few snaps.
I'm hoping to get the steering relay out while the engine is still in there in case the weight is needed. That's tomorrow's task, I think!
Re: 1960 SII 109 Teardown
Posted: Sat Apr 09, 2016 2:28 pm
by oldgravy
Alright, I'm at an irritating stage in the teardown. :?
I'm trying to remove the final major components from frame & bulkhead in preparation for hoisting out the engine, & gearbox. However, I'm stuck on almost all the things I'm trying to do.
I did buy a Pittman arm puller for the steering box, but I can't take the steering column out because I can't get the puller into the very limited space to take the drop arm off. I only have limited space because I can't get the manifolds off, the pipes being too big to get a socket onto some of the bolts and the space at the back of the engine too limited to get a regular wrench in there. Maybe I'll have to go buy a stubby crescent wrench or something.
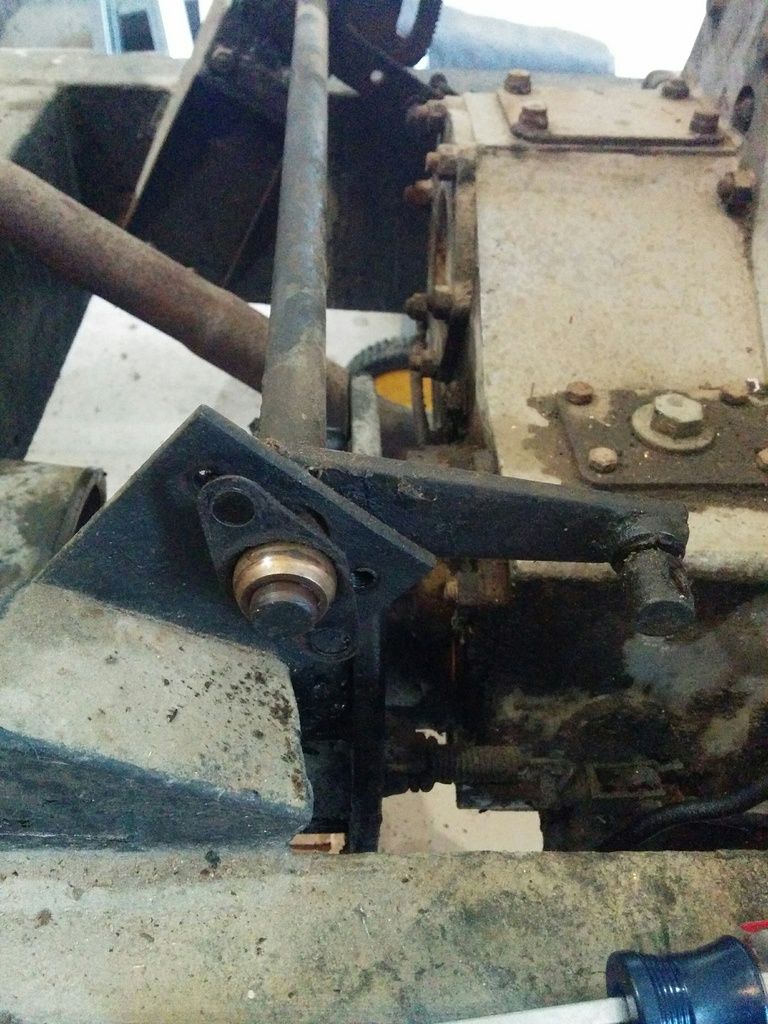
I'm also trying to get the steering relay out, but I can't get the lower plate off. It's... stuck. I've removed the bolts and tried prying it down and off the frame, but I just ended up bending the crap out of the bottom retaining plate. Unless there's some magic trick, I'm going to have to get under there and keep trying to find a way to lever it off.
Next, my preferred method for getting the relay out is to use a bottle jack and bit of wood from below to push it up and out of the frame, while the engine is still in. However, the tie rod is in the way and I can't remove it either because I can't find a way to get the ball joints off of the various relay arms in play. I bought a cheap 3-claw puller from Princess Blotto but it won't shift the arm off the ball joint:
http://i1377.photobucket.com/albums/ah4 ... wfc2zc.jpg
I must be doing something wrong, but I can't quite figure out what it is. I ended up buggering one of the threaded ends of the ball joint with the puller trying to get the arm off:
http://i1377.photobucket.com/albums/ah4 ... v6sjmm.jpg
The puller dug a significant groove in the ball joint and I blunted my puller. :(
So I can't get the steering out, can't get the manifolds off with the engine in the truck, and can't shift the relay without resorting to a BFH or buying a new, giant 2-arm puller.
Re: 1960 SII 109 Teardown
Posted: Sat Apr 09, 2016 8:17 pm
by DrRangelove
Try a ball joint splitter gravy. They need a good shock to break the taper. Alternatively two hammers will do the trick if you have good hand eye cordination (i used a splitter lol)
Re: 1960 SII 109 Teardown
Posted: Sun Apr 10, 2016 9:28 am
by John Boy
Ok, first. Place the bolt back on the threaded end of the tie rod. This will save the threads from damage. The nut should be threaded on just far enough to catch the first few threads and act as a stabilizer for your puller. So some nut on threads some nut to balance the puller contacting the tie rod. Then, tighten the puller so that pressure is on the part you want to remove. Then, with big hammer, hit the top of the puller. The part that you turn to tighten the puller. The impact to the puller, with pressure from the puller on the tie rod will jar the thing loose. The nut will stop it from flying apart. The key is puller pressure then impact the puller with hammer. Hope I explained it clear, if not, YouTube video will show it better. Cheers mate
Re: 1960 SII 109 Teardown
Posted: Sun Apr 10, 2016 3:30 pm
by Rob
I think the trick to this problem is vibration, not force, to break the tapered shaft of the ball joint loose from the drop arm. From your picture you've got the nut loosened off so without any pullers or tools putting pressure into the joint just try taping (not bashing) with moderate force the side of the drop arm perpendicular to the shaft (see the picture below, not the exact component but similar). The vibration from the impacts should go through the drop arm metal and with luck will break-free the bond between the drop arm and the tapered shaft running through it. Since I learned this trick from another rover owner I haven't used a ball-joint fork or other tools that apply force to the ball joint as the hammer taping on the side seems to work. I equate it to how the intermittent impacts of an impact driver will break a nut free that the steady force of a long wrench or bar may not.
http://forums.lr4x4.com/uploads/1165342 ... 830385.jpg
There is a pretty good article with pics on a similar project that can be found here
http://forums.lr4x4.com/index.php?showtopic=10088
I hope this helps.
Rob
Re: 1960 SII 109 Teardown
Posted: Sun Apr 10, 2016 5:55 pm
by S3ute
Hello from the antipodes.
Can't comment on the pitman arm removal because the right hand drive variants have the column and steering box on the opposite side of the engine. However, I can say that those cheap off the shelf pullers from your typical auto shop are usually fine but will also usually require having the jaws cut down a fraction to clear the arm and grip the shaft. This is more cost effective than paying the over the top price for the LR special tool.
Re the steering tie rod ends - the easiest procedure is to loosen the nuts a few turns - almost off. Then take a hammer and give a sharp tap on the nut as it is a tapered fit. Most times this is enough to dislodge the joint from the steering rods. Worked fine on mine.
Re the relay - you have my sympathy.... There is no shortage of tales of woe about adventures in that domain. Elsewhere I have suggested treating it like caring for Granny's peonies. Walk past the job every few days and give it a good watering of penetrating oil (not WD40 which is a water dispersant) and after several weeks do the block and jack trick - aided perhaps with a very large hammer.
Cheers,
Neil
Re: 1960 SII 109 Teardown
Posted: Sun Apr 10, 2016 6:21 pm
by S3ute
Hello again from the antipodes.
On further reflection re the relay I might offer a couple of bits of advice.
Firstly, getting the old unit out is usually a total pig of a job - everyone knows this. However, more often than not it isn't actually necessary. Generally, the relays don't wear out but rather suffer from histories of extremely poor maintenance. That is, from birth to death they are rarely checked to see if either the oil or seals are still OK. Usually, slack here is because either the internal cones have dried out or shrunk or the o rings have failed. More often than not simply refilling the relay with oil will bring them back to life - this is a bit tricky but there are plenty of threads around that tell you the procedure. Relay seals can be replaced without removing the unit from the chassis.
The next bit is that the replacement relays you see on eBay for around $100 are more likely than not pattern parts from India or China. More often than not these will also fail in not too distant a time. It is probably more cost- effective to have the original unit reconditioned - comments above notwithstanding.
Finally, if you do take the relay out of the chassis then think of the poor sod who might one day attempt to replace it. Coat it liberally with copper grease before reinserting it into the tube of death.....
Cheers,
Neil
Re: 1960 SII 109 Teardown
Posted: Sun Apr 10, 2016 8:16 pm
by red90
As above, on TREs, hit them hard on the side with a hammer. Just keep hitting until it pops off. It works 100% of the time. Never use a puller or fork.
The pitman arm is not tapered, so it does not work. You need a real, heavy duty pitman arm puller. The heavier dutier, the betterer.
Re: 1960 SII 109 Teardown
Posted: Mon Apr 11, 2016 4:01 am
by S3ute
Hello again from Brisbane.
Re the pitman arm and pullers. The issue of clearance aside, my own experience with removing the arm is that the puller doesn't have to be particularly big, just big enough to clear the width of the arm at the shaft - basically although the shaft isn't tapered like a tie rod end the removal procedure isn't dissimilar.
You can put the puller in place and wind it up to put a lot of pressure on the joint then give it a soak in penetrating oil for a day or so and then give it a sharp hit with a hammer. Most of the time it will release. That is, the puller doesn't necessarily pull the arm off the shaft - in fact, more often than not it doesn't - just puts enough pressure on it for the shock of the hit to do the releasing once the oil has had a chance to break the seal.
Cheers,
Re: 1960 SII 109 Teardown
Posted: Mon Apr 11, 2016 8:57 am
by oldgravy
Wow, gents, thanks very much for the advice. It is truly appreciated! I can't imagine starting, let alone continuing with this project without the community's help -- this kind of knowledge is invaluable for keeping newcomers moving.
I'll take a look at the BJs (ha!) today, I think. With some luck, I should have some progress!
@S3ute - the only reason I want the relay out is because I'm intending to have the chassis acid dipped and repaired, then give it a full repaint. It's the original chassis and it's not beyond saving, so I'd like to keep it!
Re: 1960 SII 109 Teardown
Posted: Mon Apr 11, 2016 11:39 am
by red90
oldgravy wrote:@S3ute - the only reason I want the relay out is because I'm intending to have the chassis acid dipped and repaired, then give it a full repaint. It's the original chassis and it's not beyond saving, so I'd like to keep it!
If you are stripping bare then get it galvanized. It is no more expensive than paint and much better.
Re: 1960 SII 109 Teardown
Posted: Tue Apr 12, 2016 10:03 am
by swamijake
I'd have to agree on the galvanizing. I looked into it 2 years ago and the price I got from Silver City on Annacis Island was $400 for acid dip and hot galvanize for a frame.
Re: 1960 SII 109 Teardown
Posted: Tue Apr 12, 2016 10:10 am
by swamijake
I took a relay out about a year ago with a big floor jack that I chained to the frame. I doused it in penetrating oil and cranked down on the jack as hard as I could and left it for a few days with 2 or 3 tons of pressure on it. It came out pretty easy after that. As for steering joints I use the fork thing and bash everything with a hammer in all directions. They always come loose, usually just before I get out the torch.
Re: 1960 SII 109 Teardown
Posted: Tue Apr 12, 2016 12:47 pm
by oldgravy
Success!
http://i1377.photobucket.com/albums/ah4 ... j9crsi.jpg
In the picture above, you can see how mangled the whole arrangement was by the time I'd finished with it. It took some repairs to the threads on the ball joint with a file, and some strong curse words, but it's off. As you can see, my inexpensive puller had threaded itself into the castle nut, then stripped it. You can't see the peening over on the top of the nut from where it was hit with a significant hammer, but it's there. I knew the ball joint needed replacing anyway, so realistically I just wanted it separated from the top arm off the steering relay.
The other ball joints came free considerably easier, though in some cases not without effort. New nuts for sure will be required in a couple of cases. Interestingly, two of the ball joints were replaced at some point; two have the newer grease nipples on them and have rubber that's still rubber and not powder. Time to add at least a couple of that type to the parts list...
On the arm coming off the top of the passenger side swivel there appears to be an interesting casting flaw / repair:
http://i1377.photobucket.com/albums/ah4 ... tdbshb.jpg
Seems that there was a chunk out of the metal so it was filled, incompletely, at one point. I've heard it's easier to convert the swivels to Railko bushings so when I start looking at that I may look for a replacement arm. I don't *think* the metal is that bad, but one thing for sure, this Rover has had a very hard life. There are signs everywhere! I don't think there's an un-dented surface underneath the vehicle. Every crossmember and outrigger has dents and bends in it, the sump is dented in several places, and there are some ugly frame patches below.
So I'm trying the 'ole 'use a bottle jack to free up your relay' trick, and it doesn't seem to be working:
http://i1377.photobucket.com/albums/ah4 ... z84g6u.jpg
Though having now done it and left it for 24h, there isn't enough weight in the vehicle to shift the relay, despite having lifted the front end off the ground. I've tried bashing the frame (well, the 2x4 on top of the frame) with a 4lb hammer to no avail. The relay is stuck in there for sure, so I'll need to look at the Swing Method to maybe get a little more pressure on it. Hopefully my 3 ton bottle jack will suffice!
Irritatingly, there's just one pit on the driver's side swivel ball:
http://i1377.photobucket.com/albums/ah4 ... joqcgx.jpg
I don't suppose it can be sanded smooth so as not to damage the seal too much and left? :roll: Didn't think so, so it looks like one of those will get added to the parts list as well. ;)
Frustratingly close to having a bare frame. Hopefully will have acquired an engine hoist this weekend to get the major assemblies off the frame and on to some pallets where I can work on them.
Any suggestions for pallets or other suchlike so I don't have to buy an engine stand?
Re: 1960 SII 109 Teardown
Posted: Tue Apr 12, 2016 12:55 pm
by oldgravy
@swami and @red yeah, you guys are right. I had that thought while I was disassembling my ball (joints) yesterday. If I strip the frame, how will I protect the areas I can't get to?
I didn't come up with a great answer, but it's good to know that galv is not that expensive. It'll need to go to a shop for repairs first though for sure, and I will need to source a complete rear cross-member.
Re: 1960 SII 109 Teardown
Posted: Wed Apr 13, 2016 2:46 am
by S3ute
Hello again from Brisbane.
While on the topic of tie rod ends - especially given that the ones I am seeing in the various photos look like they are now u/s - be aware that Series Land Rovers are supposed to have used two different but similar looking parts. The older trucks up to about early Series 3 had an unthreaded section on both the steering rod tube end and the tie rod joint which is where the clamp goes. The Series 3 had a thread all the way in both the tube and joint which was clamped over the thread.
Parts suppliers are likely to not notice the difference and sell the later fully threaded type which does not interchange well - either way the clamp is ineffective and usually results in premature wear of the thread and possibly failure of the steering itself. So, best to check what thread arrangement you actually have and buy the correct part for it.
Cheers,
Neil
Re: 1960 SII 109 Teardown
Posted: Wed Apr 13, 2016 2:57 am
by S3ute
oldgravy wrote:
Irritatingly, there's just one pit on the driver's side swivel ball:
http://i1377.photobucket.com/albums/ah4 ... joqcgx.jpg
I don't suppose it can be sanded smooth so as not to damage the seal too much and left? :roll: Didn't think so, so it looks like one of those will get added to the parts list as well. ;)
Frustratingly close to having a bare frame.
Hello again.
Back when these trucks were more common you used to be able to get them rechromed quite cheaply. Not now unfortunately. However, if they aren't too bad - yours seems good - some people over here sometimes use epoxy resin to fill pits and I gather with some success.
Cheers,
Neil
Re: 1960 SII 109 Teardown
Posted: Fri Apr 22, 2016 4:13 pm
by oldgravy
Well, I'm truly flummoxed by the steering relay.
Left it for a week with the weight of the truck on it -- of course, it didn't move. So today I decided to rig up a small cradle to hang the jack from the frame. I used some chain and an AR500 steel target, since I don't have anything else and (even if I did) no way to fabricate what I need... all I have is hand tools.
Anyway, the score is steering relay: 2, oldgravy: 0.
http://i1377.photobucket.com/albums/ah4 ... wkx7lt.jpg
Yes, I'm aware it's a terrible looking bodge, but it's what I have.
The relay even left a dent or two in the top of my 8-ton bottle jack:
http://i1377.photobucket.com/albums/ah4 ... dyqstj.jpg
Short of cutting it out, any last ideas?
Re: 1960 SII 109 Teardown
Posted: Sat Apr 23, 2016 10:47 am
by DrRangelove
You can try rebuilding it in situ. Thats what im doing - bought a seal kit and had same issues as you trying to remove the relay housing so i just pulled the internals. If you do this, beware of the big honking spring that is likely under tension in there!
Re: 1960 SII 109 Teardown
Posted: Sun Apr 24, 2016 4:20 pm
by oldgravy
DrRangelove wrote:You can try rebuilding it in situ. Thats what im doing - bought a seal kit and had same issues as you trying to remove the relay housing so i just pulled the internals. If you do this, beware of the big honking spring that is likely under tension in there!
I want to have the chassis acid dipped and galv'ed. So it needs to come out one way or t'other!
Re: 1960 SII 109 Teardown
Posted: Sun Apr 24, 2016 10:52 pm
by DrRangelove
Ahh i see. Have you tried applying heat yet?
Re: 1960 SII 109 Teardown
Posted: Sun Apr 24, 2016 10:55 pm
by DrRangelove
Re: 1960 SII 109 Teardown
Posted: Sun Apr 24, 2016 10:58 pm
by DrRangelove
Re: 1960 SII 109 Teardown
Posted: Mon Apr 25, 2016 6:15 am
by The_Anachronist
Gravy,
I just last night managed to get the steering column, steering box, pitman arm and whatever we call the first steering rod that runs to the relay, all out as an assembly. Had to undo all the bracket bolts, then slide and wiggle and turn the wheel and curse and then it was out.
When it's out and on the bench, getting that arm off the steering box is super easy...
Sometimes I can't believe that the same engineers somehow won the Battle of Britain!
Re: 1960 SII 109 Teardown
Posted: Mon Apr 25, 2016 9:59 am
by The_Anachronist
DrRangelove wrote:
OK that one is impressive overkill...
Re: 1960 SII 109 Teardown
Posted: Wed Apr 27, 2016 3:20 pm
by oldgravy
Thanks guys. I've tried various methods as suggested in the various videos. The score now is Relay: 3, OldGravy: 0.
Went to Alder Auto and bought a 6" puller. Figured, what the hell? May as well give that method a try.
http://i1377.photobucket.com/albums/ah4 ... 6wcjxp.jpg
Nope. That's a bent wrench, bent bracket, bent frame which as you can see has prised the ears that the bolts pass through away from the top of the relay, and that's about it. I've reefed on that thing and she ain't movin'.
I'm somewhat leery about heating up a large area of the frame to see if it'll help. Honestly worried about annealing a crucial area.
Getting very discouraged about this, actually, and all other work on the LR has stopped for the past couple weeks as a result. I've spent a fair bit buying stuff to hack together a fix and so far, no go. Time to call the professionals, or just cut the f*cking thing out. I really don't have the tools or hardware to fabricate a more robust solution.
Anyone want to buy a 6" puller? I can't imagine I'll ever use it again.
Re: 1960 SII 109 Teardown
Posted: Wed Apr 27, 2016 5:09 pm
by red90
It does not look like you have even broken the paint to the upper support. You want to at least get that cut free. The jack will have much more force that a little puller.
Re: 1960 SII 109 Teardown
Posted: Wed Apr 27, 2016 10:55 pm
by BOlson
Have you tried soaking the relay with penetrating oil? ( a 50\50 mix of acetone and ATF works great and it's cheap) or PB blaster?... We also use a Walter product called "cold shock " at work and it will free up severely seized bolts .. Don't bother with wd40 it doesn't really do anything other than make stuff shiny for a while
Re: 1960 SII 109 Teardown
Posted: Thu Apr 28, 2016 11:27 am
by The_Anachronist
Now I'm getting scared... my relay removal starts this weekend!
If you can find Aero-Kroil, that stuff is hands down the shizzle for penetrating oil/rust breaker. Soak it and walk away. Repeat for days.
As for heat annealing the steel, I think you would have to work pretty hard to get it hot enough (red-hot). And if you did, you could temper it again but I really don't think you will get there.
Shock is the other key - pressure with the puller, then a whack with the hammer on anything in contact with the seized area (not damaging stuff of course).
If it comes down to it, I have a spare sawed-out section of a 109 frame, complete with stuck relay here! Cheap!
Oh and I might just buy that puller off you... bring it with you!
Re: 1960 SII 109 Teardown
Posted: Mon May 02, 2016 9:12 am
by oldgravy
red90 wrote:It does not look like you have even broken the paint to the upper support. You want to at least get that cut free. The jack will have much more force that a little puller.
Heh, the shiny stuff you're seeing on the upper support bracket is penetrating oil.
Re: 1960 SII 109 Teardown
Posted: Mon May 02, 2016 12:13 pm
by red90
The oil won't affect or get past the paint. You need to physically remove that first.
Re: 1960 SII 109 Teardown
Posted: Sat Jun 18, 2016 5:37 pm
by oldgravy
The score is now Steering Relay: 4, OldGravy: 0. The relay has defeated me for good! :roll:
TheAnachronist popped by a couple of weeks ago and has some video of me taking his steel cradle and 12-ton bottle jack to it. Unfortunately, the frame bulged and the casting on the top of the steering relay failed, sending the top of the relay up into my garage door.
Now to go look at disassembly videos for the relay to get that spring out of there... it would seem the whole front crossmember will have to be cut out. :(
Re: 1960 SII 109 Teardown
Posted: Sun Jul 03, 2016 9:13 am
by The_Anachronist
I feel terrible! But that little bastard was NOT coming out of there... If it's any consolation my steering relay housing is cracked too! Have to look at making an adaptor ring for the Eliminator.
Re: 1960 SII 109 Teardown
Posted: Mon Sep 26, 2016 11:09 am
by oldgravy
Been a while since I posted an update. You know how it goes.
The top of the steering relay sheared right off around where a set screw seems to sit on the outside. It sat there for a couple of months as I moved on to other projects, but since the much-rumoured spring was still there and under tension, I figured I had better finally deal with the guts of the relay. So I pulled the bottom plate off, as advised, and hammered the guts down into a cardboard box with my coveralls in them to absorb any bouncy things that might fall out.
Much to my chagrin nothing happened. The spring was there, to be sure, but it just fell out the bottom with the rest of the relay guys. I was expecting all manner of things, from bearings to fireworks to dancing gnomes, and reality was quite underwhelming. Note: your mileage may vary! Read your shop manual.
These are the contents of my steering relay:
http://i1377.photobucket.com/albums/ah4 ... ofe5jc.jpg
That's it, I guess?
Maybe one day soon I'll beg / borrow an engine crane and pull out the gearbox and engine, leaving the axles and a bare frame.
Re: 1960 SII 109 Teardown
Posted: Thu Oct 06, 2016 2:24 pm
by The_Anachronist
You and me both. I have just moved house, the new garage is not only small but crammed with crap. But I will get the Rover back here and rent a hoist and we can do both in one day! (in case that doesn't happen soon enough for you, Brookswood Rentals has them, as I'm every other decent rental joint does).
Sadness over no wrench-spinning for months... between renovating, selling, moving in and more renovating, I very much doubt I will be on the Rover until the New Year at the soonest!
Re: 1960 SII 109 Teardown
Posted: Mon Jan 08, 2018 9:43 pm
by The_Anachronist
Gravy: I now own an engine crane. What’s your situation?
Re: 1960 SII 109 Teardown
Posted: Tue Jan 09, 2018 10:36 pm
by ANDYD
Hi,
I'm just about to start on my Steering relay and reading this (and other bad experiences online) makes me very nervous!
Just curious, isn't it possible to leave the relay body in place and just remove the internal parts for replacement?
cheers,
Andy
Re: 1960 SII 109 Teardown
Posted: Tue Jan 09, 2018 11:26 pm
by The_Anachronist
Well, yes, and there are those who are quite insistent that this is what you should do. Makes me nervous, personally.
If you would like to use the Eliminator, let me know. I’d recommend working up some kind of spacer to avoid the destruction Gravy and I experienced. Let me know...
Re: 1960 SII 109 Teardown
Posted: Tue Jan 09, 2018 11:35 pm
by cbalme
Andy
I didn't rebuild mine, I don't think there is much that can go wrong on the inside. I chose to fill mine with One Shot Grease through a grease nipple where the fill bolt was. It hasn't leaked out so far and my Relay turns nice and easy. I would recommend against taking it apart because from DrRangeLove's photos it looks like a hell of a job to get that spring back in.
Just my thoughts.
Re: 1960 SII 109 Teardown
Posted: Fri Jan 12, 2018 10:27 am
by DrRangelove
Hi Andy, thats exactly what I did. Its documented in my rebuild thread but the pics are no longer there (photobucket wonkers!).
Its pretty straightforward if you have a good vice, hose clamps, zip ties and a big pair of cojones!
(Scariest bit is compressing the spring and cutting the zip ties)
Re: 1960 SII 109 Teardown
Posted: Fri Jan 12, 2018 10:42 am
by DrRangelove
cbalme wrote:Andy
I didn't rebuild mine, I don't think there is much that can go wrong on the inside. I chose to fill mine with One Shot Grease through a grease nipple where the fill bolt was. It hasn't leaked out so far and my Relay turns nice and easy. I would recommend against taking it apart because from DrRangeLove's photos it looks like a hell of a job to get that spring back in.
Just my thoughts.
In theory its easy but its a finnickity job - i had to recompress the spring a dozen times before i got it right as the spring wants to bulge and bow when you add tension. The first time i tried to get it back in the relay the spring was compressed but bowed and i ended up busting the washers as i cranked it back in the housing - i attribute this more to my impatience and brute stupidity though. A pro such as Andy probably wouldn’t make this mistake!
If anyone decides to go down this route, make sure you wear a good full face shield. Goggles alone are not enough...
Im glad i rebuilt it with new tufnol bushes, seals and filled with EP90 (used gasket maker also to be extra safe) - it steers beautifully now and doesnt leak. Someone in the past had done the bearing grease method and the internals of the relay were rusting. The tufnol bushes were also pretty worn out, i guess due to insufficient lubrication. One shot might be better than bearing grease though...
Re: 1960 SII 109 Teardown
Posted: Mon Jan 15, 2018 2:54 pm
by oldgravy
My plan was (is) to just get a new one. Even if I didn't have to cut the old one out of the frame, I anticipated the surfaces inside we're going to be too pitted to be salvageable. Now, with the housing still in the frame I have no choice. But hey, at least I don't have to worry about disassembly!
Mr. Anachronist, my engine and gearbox are in the frame still and I need to buy an engine stand off of Craigslist. Otherwise, I am good to pull it out!
Re: 1960 SII 109 Teardown
Posted: Wed Jan 17, 2018 9:55 am
by The_Anachronist
Ok Gravy, just let me know when you want to use it!
Re: 1960 SII 109 Teardown
Posted: Thu Sep 13, 2018 1:08 pm
by oldgravy
The disassembly of the LR is almost complete. I'm so close I can taste it! The only thing that remains attached to the frame is the rear axle housing and leaf springs. Everything else is detached and in the basement or on an engine stand.
The attachment IMG_20180912_204417.jpg is no longer available
Some problems remain, however. I can't get one of the hubs off of the brake drum. The screw you see is the best one I have left after mangling the others to get them out. I've tried pounding on it with a block of wood and a 4lb hammer but no go. I may have to see if I can make a poor man's shop press by putting it underneath a bottle jack and trying to lift my pickup.
I have a stubborn bearing to remove. Judging by the amount of mileage this old truck likely did I'm sure I'll want to replace it, but I don't want to pry the sh*t out of the thing lest I do some permanent damage.
Also I don't know why the brake backing plates were painted yellow. They just were.
Oh, and if you've followed this thread at all you'll not be surprised to learn that only one of the bolts for the backing plate on the right rear was finger tight -- the rest were loose (wobbly) enough to undo by hand.
The keen-eyed among you will see a bunch of shiny stuff on the shop rag in this photo. That's metal from inside the axle casing. Also, when I drained the diff there were a few 'chunks' that came out. Not encouraging for the diff, but we'll get to that later.
So that's where we are. Close, but no cigar -- yet.
Re: 1960 SII 109 Teardown
Posted: Fri Sep 14, 2018 6:57 am
by red90
That spindle with the stuck bearing is toast anyway with so many deep gouges, so I would just replace it. To remove the drum, you need to put a normal hex head bolt into the threaded hole and push it off.
Re: 1960 SII 109 Teardown
Posted: Fri Sep 14, 2018 1:53 pm
by oldgravy
Thanks for both tips, @red90!
Re: 1960 SII 109 Teardown
Posted: Sun Sep 16, 2018 6:03 pm
by oldgravy
As it turns out, the thread pattern is weird. Some Google Fu suggested the threads on the drum were 5/16UNC, but that's not the case. Took one of my drum screws in to Alder Auto and the very helpful gentleman couldn't match the threads with his testers to anything -- not even whitworth.
Anyone know what S2 brake drums will take in the hub removal hole?
Re: 1960 SII 109 Teardown
Posted: Sun Sep 16, 2018 7:53 pm
by red90
3/8" BSW (coarse whitworth) originally. Newer drums on Defenders are 8 mm, so if a new drum was used, it could be that.
I assume you have the adjusters backed off?
Re: 1960 SII 109 Teardown
Posted: Tue Sep 18, 2018 4:28 pm
by oldgravy
You shouldn't assume anything given my intellect.
However in this case the drum / hub are both off the backing plate and on my work bench with the pads in a bucket for disposal. So, I think the drum and hub are just rusted together. Everything else is off.
Thanks for the thread pattern. I'll have to see if I can find a bolt to match!
Re: 1960 SII 109 Teardown
Posted: Thu Oct 04, 2018 4:07 pm
by oldgravy
Managed to get the rear axle off after some judicious application of the Land Rover Universal Part Removal Tool -- the u-bolts were not coming off no matter how many bad words I used. I even got creative with some of the bad words and it didn't work so I just rationalized that the bolts were non-reusable components anyway. Right?
The rear leaf springs were odd, of course. It seemed that one was shorter than the other, or maybe it was just collapsed slightly. The rear shackles were not at the same angle. In fact, there was a substantial difference between the two. Not worried about it, as I don't intend to keep the springs. They'll go to one of my in-laws for blade making.
I have to decide what to do with the rear axle. Readers might be kind enough to recall that the rear diff had chunks coming out with the EP90 when I drained it, and a bunch of silvery metal flakes in the bottom of the axle casing. Then, the bottom of the axle casing has had the pin holes elongated, somehow. Is this normal for LRs?
I know Land Rovers often have oval-shaped holes for bolts but surely this can't be right. Right?
Re: 1960 SII 109 Teardown
Posted: Thu Oct 04, 2018 5:28 pm
by mepham55
That looks like the rear springs were loose and shifting a lot! I have a good rear axle case for a 109 if you’d like to replace that one.
Matt
Re: 1960 SII 109 Teardown
Posted: Fri Oct 05, 2018 4:09 pm
by oldgravy
Thanks Matt, might have to take you up on that some day. I'll have to take a look at the diff and see what shape it's in.
The pins on the leaf springs look fine. Maybe they're replacements? But there's no elongation on the leaves, so... I dunno, it looks to me like someone took a die grinder to it to make it fit and align properly.
Re: 1960 SII 109 Teardown
Posted: Tue Oct 09, 2018 11:33 am
by oldgravy
Well, that's it, folks. Four years after I started pulling this thing apart, it's finally down to a bare frame -- or as bare as it's going to get!
During that time I've had a(nother) baby, moved house, moved the land rover, and picked up and dropped a few hobbies along the way. You know how it is.
The axles are stripped of their major components, though the diffs are still inside. I'll get to those inevitably.
I'm going to post a short "lessons learned" topic in a few days I hope, but for now... job done!
Re: 1960 SII 109 Teardown
Posted: Thu Jun 06, 2019 3:43 pm
by oldgravy
Well, I think I need some advice.
I have my rear axle up on the cart for cleaning and to take a look at the rear diff. However, I wonder if I am wasting my time; the axle casing has locator holes for the studs on the leaf springs and mine are... not round.
That seems suboptimal. The axle housing is dinged up (and maybe repaired) and knowing that chunks already came out with the EP90 I wonder if it's even worth my time cleaning it up.