

Made some serious progress getting to the SII this weekend. Managed to get the wings, cab, floor, and seat box all out along with the fuel tank. Drained about 20L of some brownish looking fluid that smelled like turpentine out of it.
Found some interesting things.
There are some ugly frame patches. Here:
http://imgur.com/Ahz7NFi.jpg
... and here:
http://imgur.com/P5jzxDX.jpg
Also discovered these:
http://imgur.com/NbAiPjN.jpg
Because why not? One thing does confuse me though, and that's this exhaust manifold + exhaust arrangement:
http://imgur.com/BKRnVwl.jpg
Notice my dipstick all bent out of shape by the exhaust downpipe.
1960 SII 109 Teardown
-
oldgravy
- Captain Crunch
- Posts: 268
- Joined: Tue Aug 20, 2013 9:37 am
- Location: Surrey / Langley
- Contact:
1960 SII 109 Teardown
Last edited by oldgravy on Mon Jun 16, 2014 11:44 am, edited 1 time in total.
-
TOLON
Re: 1960 SII 109 Teardown
I believe that gooseneck exhaust is standard on a 1960 SII but can be replaced with the later manifold that routes straight down between the block and the frame.
That mini coilover conversion is interesting...
That mini coilover conversion is interesting...
-
oldgravy
- Captain Crunch
- Posts: 268
- Joined: Tue Aug 20, 2013 9:37 am
- Location: Surrey / Langley
- Contact:
Re: 1960 SII 109 Teardown
The problem with the "gooseneck" exhaust is that it's right on top of the dipstick. In fact, they rub. Mind you, the pipe doesn't appear to be original as it also rubs on the frame further down.TOLON wrote:I believe that gooseneck exhaust is standard on a 1960 SII but can be replaced with the later manifold that routes straight down between the block and the frame.
That mini coilover conversion is interesting...
I have no idea what those coilovers are for, or from. Could be from a trailer or a golf cart for all I know. They don't appear to fit all that well as there's a bend / bind in one of the springs.
... the mysteries continue!
-
oldgravy
- Captain Crunch
- Posts: 268
- Joined: Tue Aug 20, 2013 9:37 am
- Location: Surrey / Langley
- Contact:
Re: 1960 SII 109 Teardown
The bulkhead looks okay except for some welded-in patches.
Front wing off:
http://i.imgur.com/TioVALw.jpg
A closer look at the patch on the passenger's side:
http://i.imgur.com/0pr2DgD.jpg
But the driver's side is worse, sadly. Inside:
http://i.imgur.com/XgjYPSD.jpg
and outside:
http://i.imgur.com/b949FQc.jpg
I pulled the rotted wire for the headlight dip switch through what looks like bathroom caulk or silicone or something. Not sure how much metal is there, but probably less than I hope.
-
DrRangelove
- Hot Manifold
- Posts: 246
- Joined: Mon Nov 19, 2012 12:07 pm
- Location: Parksville, Vancouver Island
Re: 1960 SII 109 Teardown
Interesting choice in colour by the PO - must have had a special on "safety Yellow" down at Lordco back in the day!
Are those servo assist breaks you have there?
Are those servo assist breaks you have there?
-
oldgravy
- Captain Crunch
- Posts: 268
- Joined: Tue Aug 20, 2013 9:37 am
- Location: Surrey / Langley
- Contact:
Re: 1960 SII 109 Teardown
I believe it's house paint. :roll:DrRangelove wrote:Interesting choice in colour by the PO - must have had a special on "safety Yellow" down at Lordco back in the day!
Are those servo assist breaks you have there?
I don't *believe* there's a servo in the system, but as I'm still learning I'll likely 'follow my nose' like Toucan Sam and see if I can uncover a box of froot loops aka a brake booster!
-
sailourboy
- Cross Member
- Posts: 191
- Joined: Sat Apr 24, 2004 2:06 pm
Re: 1960 SII 109 Teardown
My old 109 PU with a 6 cl had the same colour yellow throughout the truck
Cheers
Ted
Cheers
Ted
-
oldgravy
- Captain Crunch
- Posts: 268
- Joined: Tue Aug 20, 2013 9:37 am
- Location: Surrey / Langley
- Contact:
Re: 1960 SII 109 Teardown
Cool. The original colour was yellow as well but it had a bit more orange in it, I think, and I quite like it. Might be nice to go back to that, budget depending!sailourboy wrote:My old 109 PU with a 6 cl had the same colour yellow throughout the truck
-
Gromit Dog
Re: 1960 SII 109 Teardown
Those coil overs were common about 40 odd years ago. an aftermarket "towing" thing usually found on big sedans and wagons.. in the back... interesting application though :)
-
oldgravy
- Captain Crunch
- Posts: 268
- Joined: Tue Aug 20, 2013 9:37 am
- Location: Surrey / Langley
- Contact:
Re: 1960 SII 109 Teardown
I'm led to understand the truck used to be a prospecting vehicle. It would get a lift on a trailer then was likely used to carry rocks, I guess. The bed of the pickup is pretty well-used so I suspect she's seen some weight.Gromit Dog wrote:Those coil overs were common about 40 odd years ago. an aftermarket "towing" thing usually found on big sedans and wagons.. in the back... interesting application though :)
-
oldgravy
- Captain Crunch
- Posts: 268
- Joined: Tue Aug 20, 2013 9:37 am
- Location: Surrey / Langley
- Contact:
Re: 1960 SII 109 Teardown
Took another poke around this past weekend; not getting up to the Okanagan as much as I'd like, so work on the truck is slow.
Pulled some grotty wiring out of a junction box and started to photo document some of the wiring behind the panel. It's a mishmash of house wiring, some original, and some 'repaired' stuff from a PO.
Decided to go with a complete loom which I'll have to pick up from RN or Autosparks or something. Any recommendations?
Plan so far is to continue to take things off down to the frame, get the frame patched and repainted, then start rebuilding. I'm not sure it'll be as nice as most other restorations, but I'm certainly looking for a functional rebuild.
Might consider having a scallop cut in the front x-member to accommodate a potential future transmission / TDI engine upgrade. We'll see!
-
Dave_F
- Washed Up
- Posts: 694
- Joined: Wed Nov 14, 2007 10:39 pm
- Location: Deep Cove, N.Van
- Contact:
Re: 1960 SII 109 Teardown
Go with Autosparks....got mine from them, great service and product.
You may need to change out some of the connectors but other than that spot on.....
You may need to change out some of the connectors but other than that spot on.....
-
oldgravy
- Captain Crunch
- Posts: 268
- Joined: Tue Aug 20, 2013 9:37 am
- Location: Surrey / Langley
- Contact:
Re: 1960 SII 109 Teardown
Update time!
The truck has been moved here to the lower mainland now and sat in my garage for a couple of months. Currently in between jobs which has afforded me some time to tinker.
Stripped a bunch of stuff off the bulkhead and I'm discovering quite a few problems. Fortunately, *knocks on wood* most of the bolts have come out without too much trouble.
Current status:
http://i1377.photobucket.com/albums/ah4 ... cpal0q.jpg
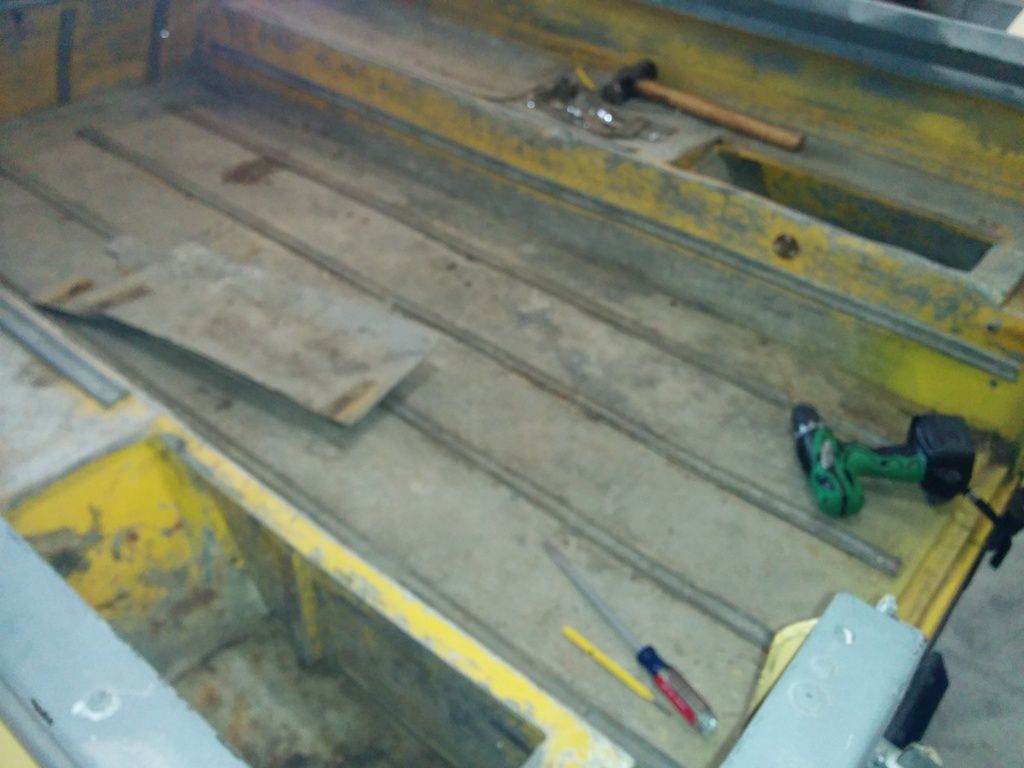
I broke three drill bits getting the bent, rent toolbox cover flaps off. The rear tub looks heavily used and is collapsed down the right side. I don't know if it's salvageable. It's definitely not straight.
http://i1377.photobucket.com/albums/ah4 ... mfbofv.jpg
The rear bumper is totally shot. I knew it was bad, but not quite this bad. I don't think it's a whole bumper. I think someone fabricated the left side as it's missing the bracket to bolt to the rear tub. The right side is bent and crushed. It's rusted through in the frame as well. :(
http://i1377.photobucket.com/albums/ah4 ... ku5217.jpg
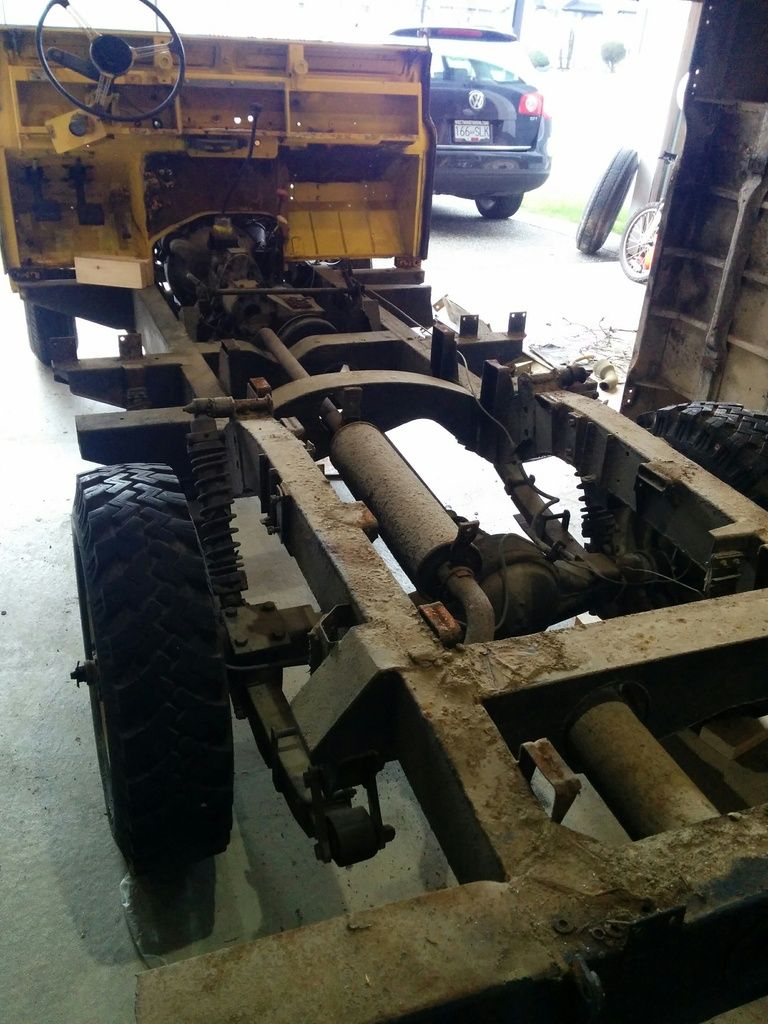
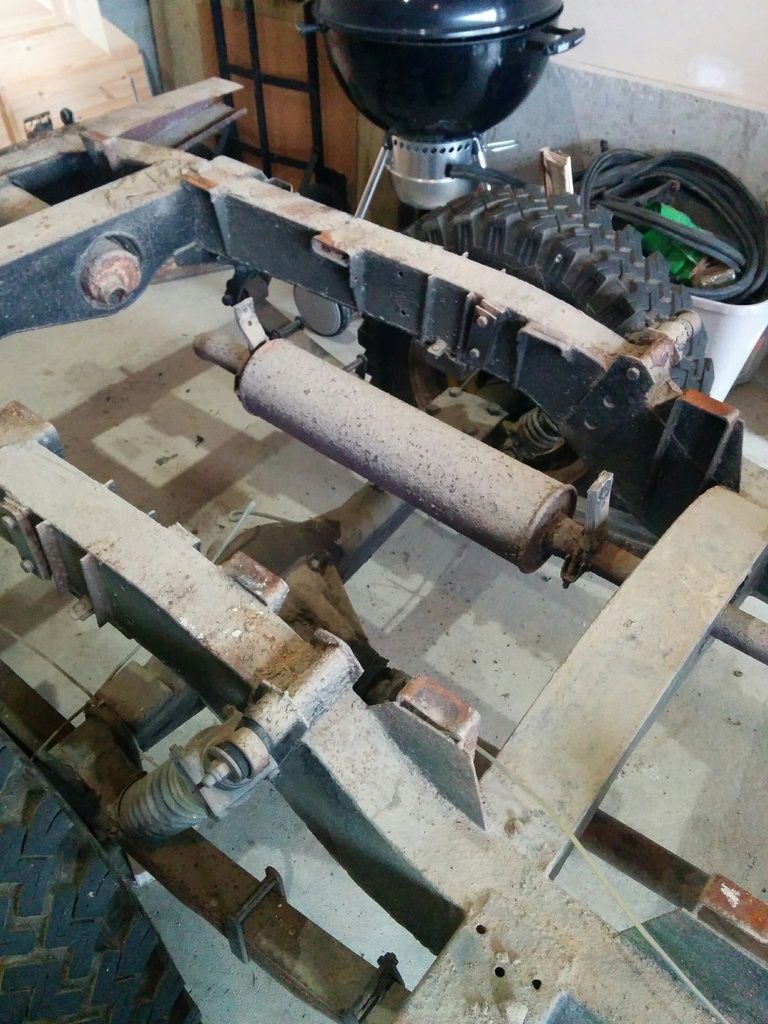
The frame around the spring hangers doesn't look too bad though, but I'll definitely have to dig in there more. I suspect the tube at the top of the shock mounting points (the part that goes over the frame) is toast. There's tons of corrosion and I don't know if the tubes are stout enough anymore.
http://i1377.photobucket.com/albums/ah4 ... dmuewi.jpg
I'm pleased with my progress, but somewhat chagrined at the scope of problem areas I'm discovering.
The truck has been moved here to the lower mainland now and sat in my garage for a couple of months. Currently in between jobs which has afforded me some time to tinker.
Stripped a bunch of stuff off the bulkhead and I'm discovering quite a few problems. Fortunately, *knocks on wood* most of the bolts have come out without too much trouble.
Current status:
http://i1377.photobucket.com/albums/ah4 ... cpal0q.jpg
I broke three drill bits getting the bent, rent toolbox cover flaps off. The rear tub looks heavily used and is collapsed down the right side. I don't know if it's salvageable. It's definitely not straight.
http://i1377.photobucket.com/albums/ah4 ... mfbofv.jpg
The rear bumper is totally shot. I knew it was bad, but not quite this bad. I don't think it's a whole bumper. I think someone fabricated the left side as it's missing the bracket to bolt to the rear tub. The right side is bent and crushed. It's rusted through in the frame as well. :(
http://i1377.photobucket.com/albums/ah4 ... ku5217.jpg
The frame around the spring hangers doesn't look too bad though, but I'll definitely have to dig in there more. I suspect the tube at the top of the shock mounting points (the part that goes over the frame) is toast. There's tons of corrosion and I don't know if the tubes are stout enough anymore.
http://i1377.photobucket.com/albums/ah4 ... dmuewi.jpg
I'm pleased with my progress, but somewhat chagrined at the scope of problem areas I'm discovering.
-
andrewMcF
- Crank Case
- Posts: 125
- Joined: Thu Jul 17, 2008 9:30 pm
- Location: Kelowna
Re: 1960 SII 109 Teardown
Don't get discouraged!!! It's like eating an elephant, one bite at a time. Just sometimes the bits of the elephant comes backup and you have to do it over again... LOL
-
DrRangelove
- Hot Manifold
- Posts: 246
- Joined: Mon Nov 19, 2012 12:07 pm
- Location: Parksville, Vancouver Island
Re: 1960 SII 109 Teardown
As far as frames go you've got a goodun'! A little attention here and there and you'll be good for another 50 years of rot free rovering!
May i suggest doing a good thick coat of waxoyl on the frame before you put everything back together? I did the same with mine knowing therell be bits i will never get to again once the tub is on (top rails for example)
May i suggest doing a good thick coat of waxoyl on the frame before you put everything back together? I did the same with mine knowing therell be bits i will never get to again once the tub is on (top rails for example)
-
oldgravy
- Captain Crunch
- Posts: 268
- Joined: Tue Aug 20, 2013 9:37 am
- Location: Surrey / Langley
- Contact:
Re: 1960 SII 109 Teardown
One hopes! It will definitely need to make its way to a proper shop, though, for some TLC and repairs. Any recommendations for rover-friendly shops in the suburbs? It'll probably take me a while to get there, but it's nice to get an idea of what I'm looking at from a cost perspective.DrRangelove wrote:As far as frames go you've got a goodun'! A little attention here and there and you'll be good for another 50 years of rot free rovering!
Did I read in another thread that someone locally is doing... Dinitrol or something, supposed to be similar?DrRangelove wrote:May i suggest doing a good thick coat of waxoyl on the frame before you put everything back together? I did the same with mine knowing therell be bits i will never get to again once the tub is on (top rails for example)
Took a hammer to some suspect-looking spots and it seems fairly good. Fingers crossed!
Next I'll have to drain all the fluids, finish stripping the bulkhead, and start removing bits and bobs like the rear propshaft (shot,) handbrake (looks OK,) front apron (looks good,) and so forth.
-
oldgravy
- Captain Crunch
- Posts: 268
- Joined: Tue Aug 20, 2013 9:37 am
- Location: Surrey / Langley
- Contact:
Re: 1960 SII 109 Teardown
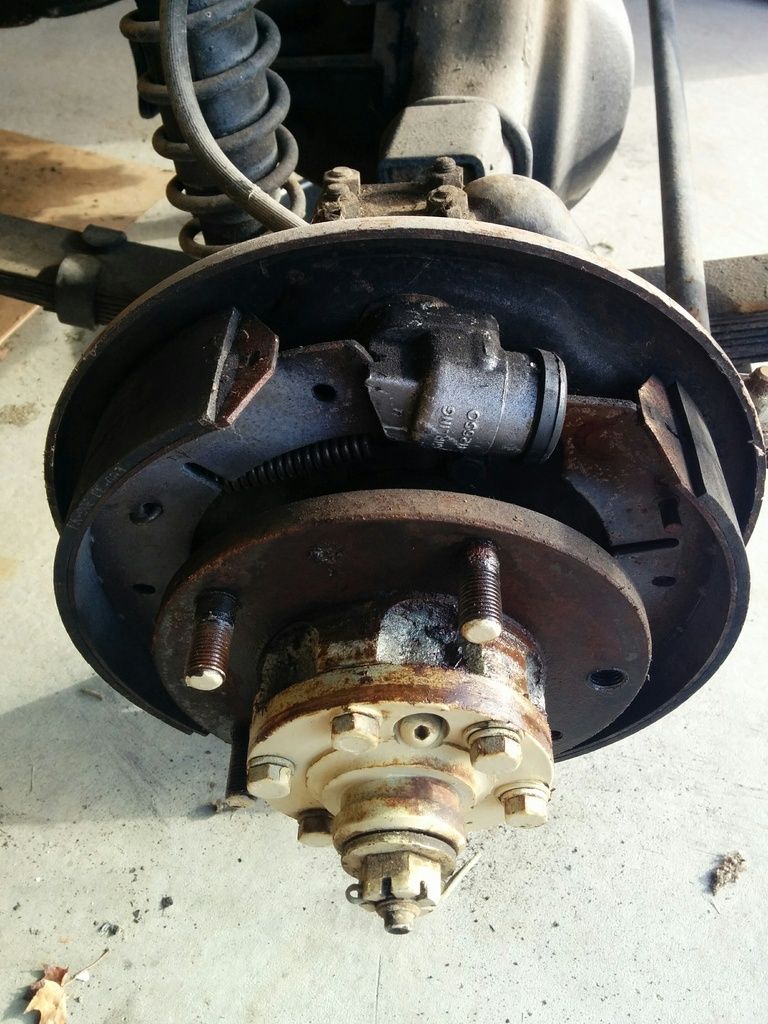
Attempted to remove the propshaft. Two of the propshaft nuts came off no problem, but the other two spun the bolts inside the drum, making an irritating process just a little more fun. So off came the drum.
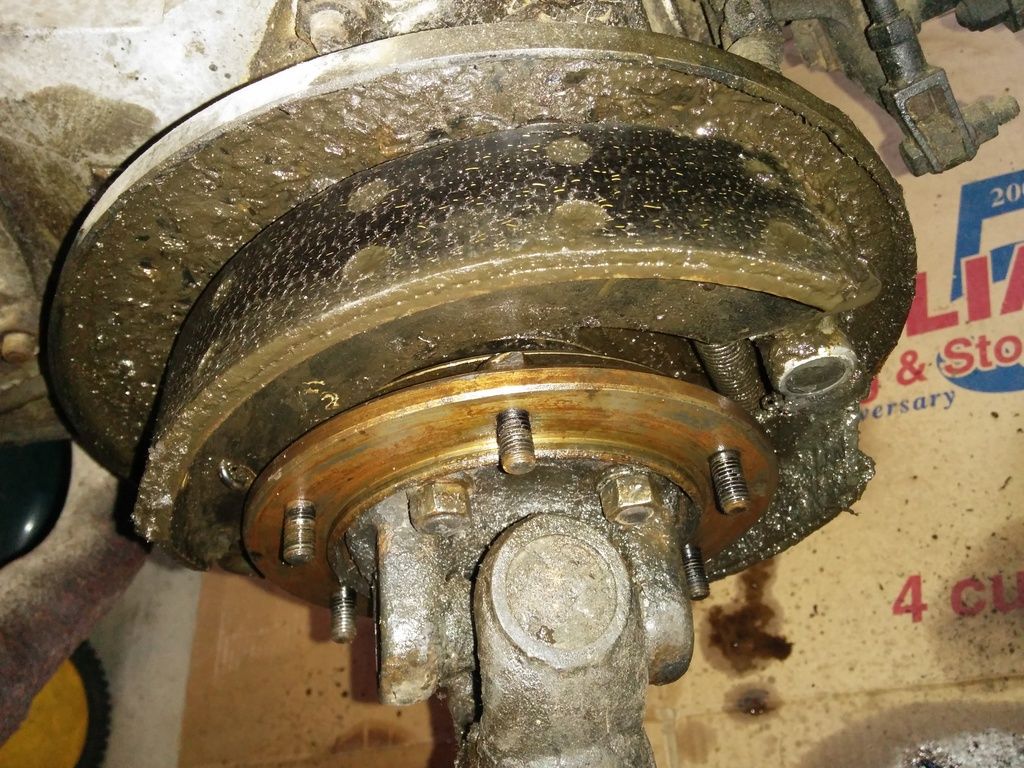
I don't know much about vehicle repairs, or brakes in particular, but I'm pretty sure drum brakes aren't supposed to be dripping in greasy sludge.
http://i1377.photobucket.com/albums/ah4 ... eqpwnb.jpg
Getting the brake shoes out was a lot of trouble. I ended up prying the hell out of 'em with my biggest screwdriver. Those springs are strong! I levered the shoes up over the flange for the brake drum so I could get behind 'em and get the springs off. What a pain.
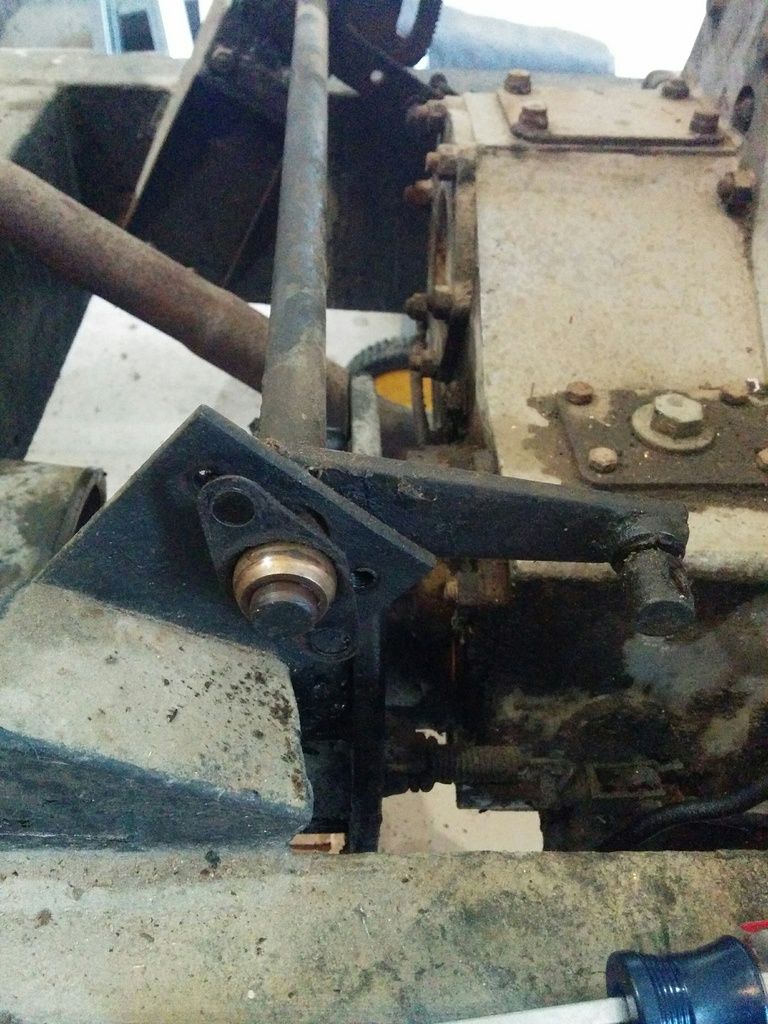
To do that I had to disassemble the handbrake linkage, which seems as though it was designed to be as complicated as possible.
http://i1377.photobucket.com/albums/ah4 ... y1xt91.jpg
But all is removed, now, and I can start taking off the flange. Or maybe I'll just forget it and work on the bulkhead instead. ;)
I don't know much about vehicle repairs, or brakes in particular, but I'm pretty sure drum brakes aren't supposed to be dripping in greasy sludge.
http://i1377.photobucket.com/albums/ah4 ... eqpwnb.jpg
Getting the brake shoes out was a lot of trouble. I ended up prying the hell out of 'em with my biggest screwdriver. Those springs are strong! I levered the shoes up over the flange for the brake drum so I could get behind 'em and get the springs off. What a pain.
To do that I had to disassemble the handbrake linkage, which seems as though it was designed to be as complicated as possible.
http://i1377.photobucket.com/albums/ah4 ... y1xt91.jpg
But all is removed, now, and I can start taking off the flange. Or maybe I'll just forget it and work on the bulkhead instead. ;)
-
DrRangelove
- Hot Manifold
- Posts: 246
- Joined: Mon Nov 19, 2012 12:07 pm
- Location: Parksville, Vancouver Island
Re: 1960 SII 109 Teardown
I think one of the Rover shops in North Van is doing it... it's really not hard once the body is off the frame though - the access is obviously much better and you can get to all the holes on the top rail to actually get oil inside the frame. I just painted parafin based wax oil (Lordco) direct onto the frame with an old brush. It goes on nice and thick, and dries into a flexible, impenetrable layer if you do a couple of coats. If I was doing the frame on a running vehicle, I'd probably take it into a shop for convenience as it is a bit of a dirty job if you have the body on...oldgravy wrote:
Did I read in another thread that someone locally is doing... Dinitrol or something, supposed to be similar?
-
oldgravy
- Captain Crunch
- Posts: 268
- Joined: Tue Aug 20, 2013 9:37 am
- Location: Surrey / Langley
- Contact:
Re: 1960 SII 109 Teardown
The restoration I'm working on will be almost frame-off. The bulkhead will have to come off for footwell and tunnel cover repairs. I may take the engine out for a refurb and painting / cleanup as it was non-running when I bought it. Don't know what the problem is, but I suspect starter + spark are both issues.DrRangelove wrote:I think one of the Rover shops in North Van is doing it... it's really not hard once the body is off the frame though - the access is obviously much better and you can get to all the holes on the top rail to actually get oil inside the frame. I just painted parafin based wax oil (Lordco) direct onto the frame with an old brush. It goes on nice and thick, and dries into a flexible, impenetrable layer if you do a couple of coats. If I was doing the frame on a running vehicle, I'd probably take it into a shop for convenience as it is a bit of a dirty job if you have the body on...
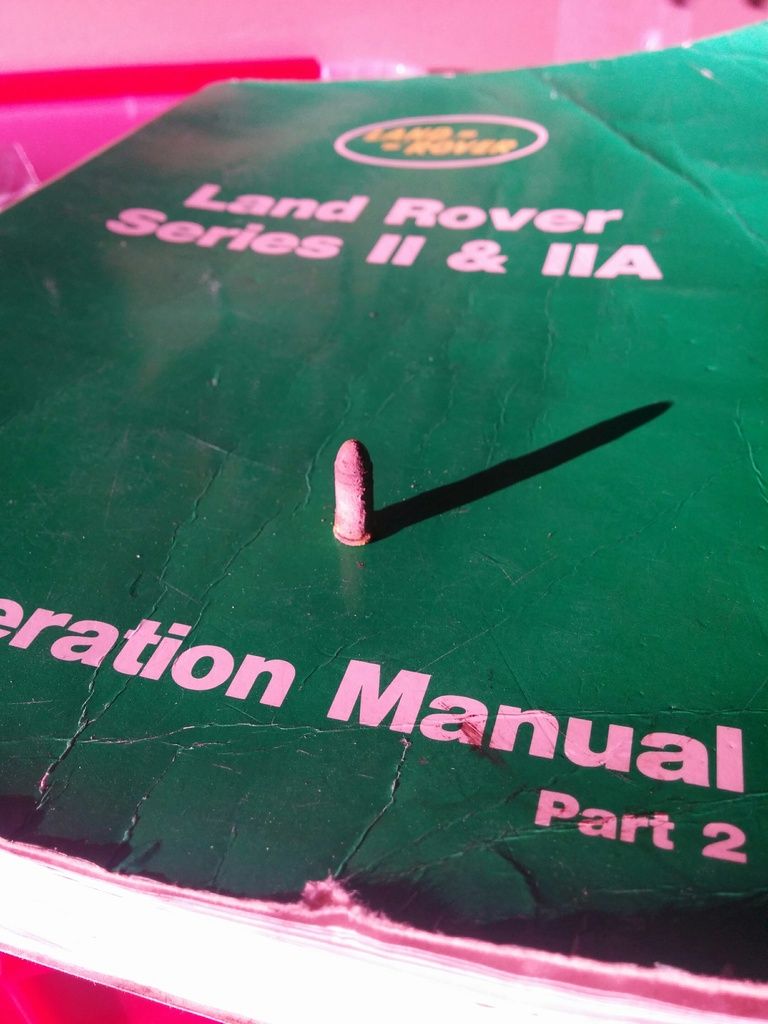
Today's work involved pulling more bits off the bulkhead, including finding this little gem (a .22 short round) wedged in the driver's side vent arrangement. Not sure why the photo is pink, it's possible my phone doesn't know that spring is here.
http://i1377.photobucket.com/albums/ah4 ... vjh01g.jpg
... and then I got a little sidetracked with a new problem.
First, the bulkhead continues to be stripped; all I have left are the pedals & cylinders, the throttle linkage, and a few lower-down bits and bobs -- then she should be ready to remove. I had decided in the past couple of days to roll the truck out of the garage for a hose down / clean out and rearrange my workspace now that I've pulled the tub off (single handedly, which was kind of dumb.) The truck has always been hard to roll around so I thought, what the hell, may as well check and see if something was stuck.
Sure enough, got both front wheels off the ground and both wheels barely turn, or at least not without great effort. So I cracked open my service manuals and decided to see if the brake adjusters just need fiddling. I backed both off on each wheel and I figure I must be doing something wrong, because now I can't turn the wheels at all. Surely the adjusters go counterclockwise until they stop, which is a few turns?
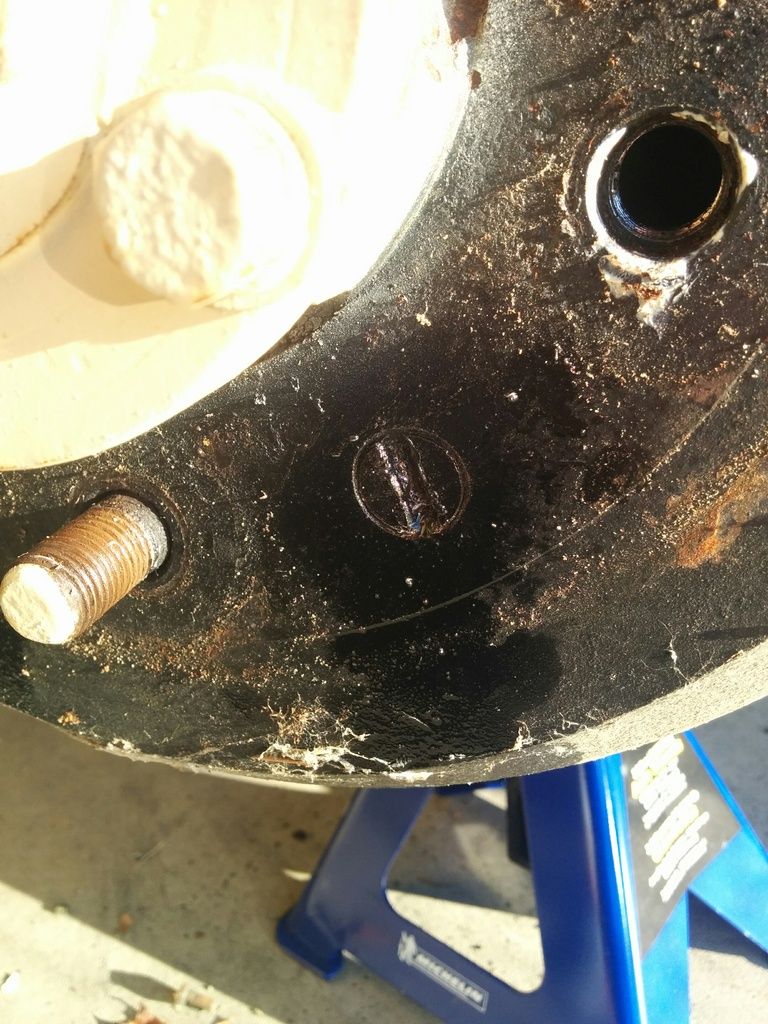
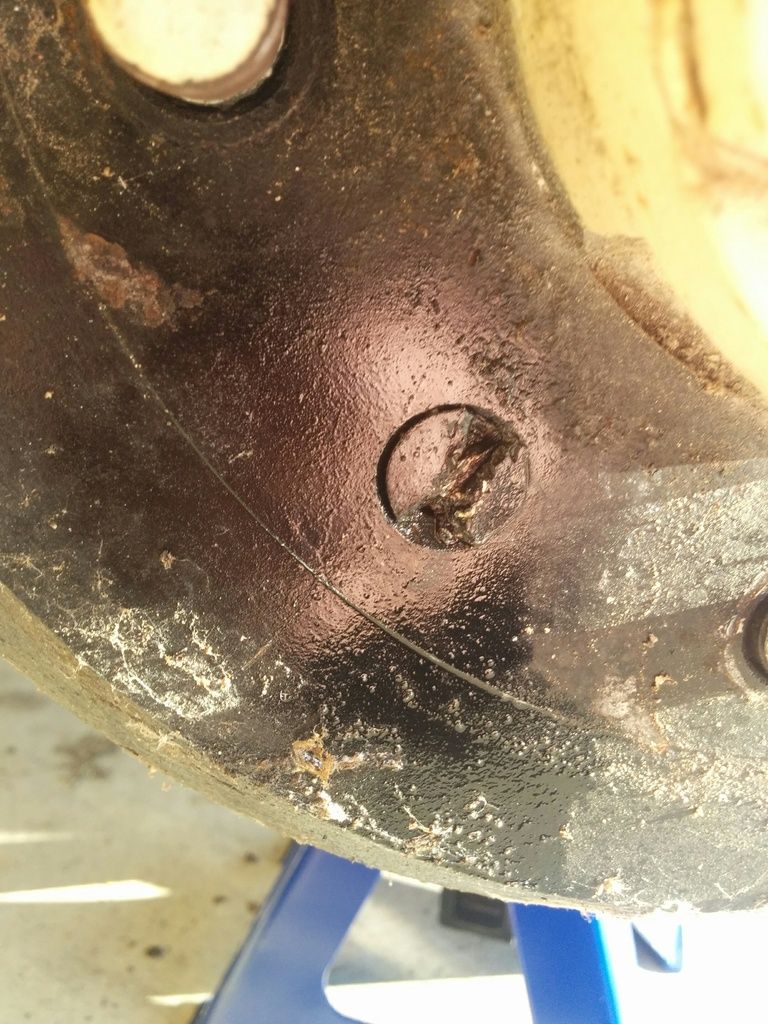
OK, thought I, I'll just pop the drums off and see what's what. Maybe I can drift them off or something! I pulled one of the wheels and found the two screws holding the drums on are stripped all to heck and look like someone tried to chisel them off. I'm not sure how I'm going to get around this problem.
http://i1377.photobucket.com/albums/ah4 ... skhwiu.jpg
and
http://i1377.photobucket.com/albums/ah4 ... o4infc.jpg
Part of me thinks, OK, maybe I'll just hit one edge of the bolt with a punch or something and see if I can get it to turn. Or, maybe I can just try and find something thick enough (that's what she said) to get some kind of purchase on the bolt head. I don't think I have the technology to drill the head off, and besides, where would that leave me? My only other idea is to drill small holes into the remaining bolt head face (if that's a term) and use some circlip pliers or similar to try and spin the bolt.
I don't even know if I can get the drum off even if I can get those bolts out. Hmm.
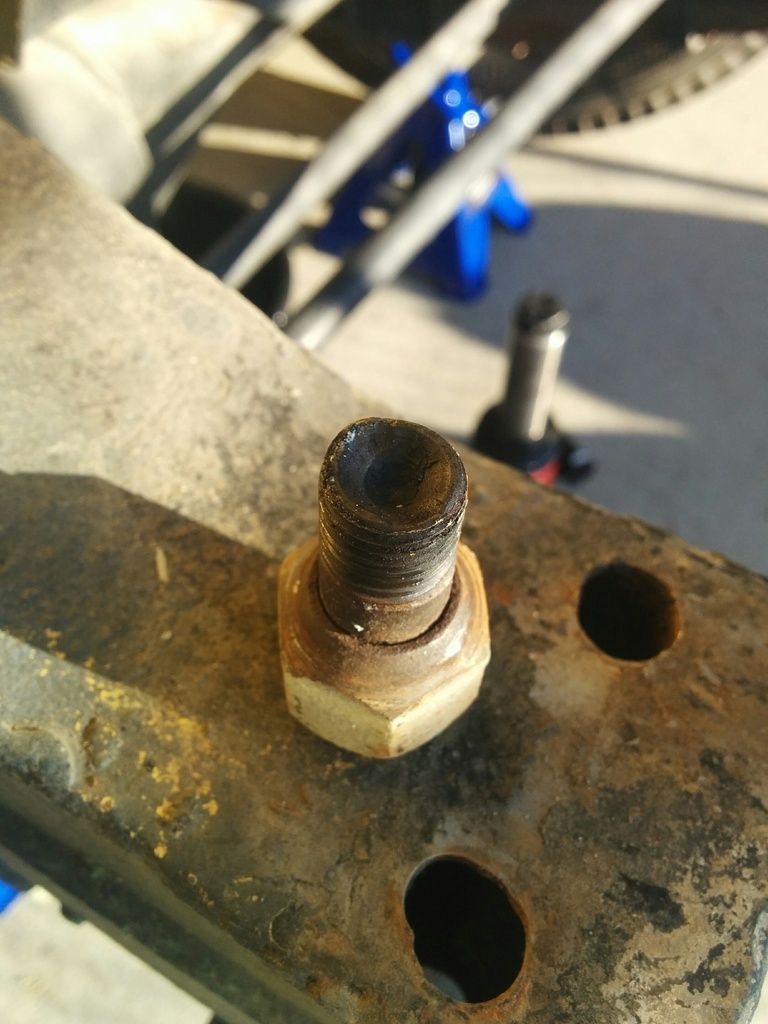
Interestingly, one of my wheel nuts came off with the thread stuck in it. Does that happen, sometimes?
http://i1377.photobucket.com/albums/ah4 ... rgpvqv.jpg
-
Rambler
- Over Inflated
- Posts: 171
- Joined: Sun Aug 03, 2014 1:44 pm
- Location: Saskatchewan
Re: 1960 SII 109 Teardown
Sorry to hear of the problems. I faced similar issues with some wheels not turning when pushing my S2 into the garage. Found that the springs had snapped so the shoes were jammed up against the drums. When trying to take said drums off to fix this my screws were in a similar state. I did luck out with a cheap impact driver (the kind for pounding in screws when you are too lazy to drill a hole) worked a treat. Just need a good quality bit and the impact motion does the hard stuff. Failing this you couod try an impact driver (the type you hit with a hammer). Good luck with things.
Re the stud coming away with the nut. Yep also happened to me. The older Series 2 and 2As had screw in studs that are peened over on the inside of the hub. Over enthusuastic garages will over torque your wheel nuts when swapping tyres. As a result this breaks the studs loose and these can fall out with dangerous consequences. I read that a good solution was to remove the hub. Drill or dremel out the original 9/16" hole slightly, and then to drive in from the rear a push in stud that are available in 9/16" or larger stud sizes. The only snag
I found with doing this was the new stud is shorter (no tapered hole on the back of the hub for this stud tail to sit in). I have replaced the original S2 double sided lug nut on this shorter stud with a single taper lug nut. I can dig out part numbers if this helps.
Cheers,
Ian
-
Rambler
- Over Inflated
- Posts: 171
- Joined: Sun Aug 03, 2014 1:44 pm
- Location: Saskatchewan
Re: 1960 SII 109 Teardown
One interesting thing I found re the tiny screws (part number 1510) that are all churned up, is the new ones come in 2 types. My 1961 early hubs accept the black screws and these go in flush. Sadly most part suppliers ship the silver screws to you and they are a little bigger - so wont go in flush with the brake drum surface. I bet the reason your screws are so mangled is that a previous owner tried with all their might to screw them in flush and failed turning the soft metal screws into a mess. I have ordered the screws from several parts suppliers and cannot find more of the black screws - they just ship the silver type that are too big and made of cheese (to quote someone on youtube talking about bp bolts!)
-
DrRangelove
- Hot Manifold
- Posts: 246
- Joined: Mon Nov 19, 2012 12:07 pm
- Location: Parksville, Vancouver Island
Re: 1960 SII 109 Teardown
Those look pretty mangled mate... I had the same thing on mine. penetrating fluid, heat and patience will sort them out. Drilling out would be a last resort - hope it doesn't come to that!
-
oldgravy
- Captain Crunch
- Posts: 268
- Joined: Tue Aug 20, 2013 9:37 am
- Location: Surrey / Langley
- Contact:
Re: 1960 SII 109 Teardown
Thanks, guys. Appreciate the tips & advice as always!
Bad news indeed if the hub is stripped / knackered. It might be best to get a newer one, depending upon its condition.
Looking again at the screws, it seems as though someone already thought of my idea of drilling in two holes to use to spin them out -- in one of the pictures you can almost make out two indents at either side of the bolt head. Hmm. Might have to run outside and see if I can get 'em off!
I'd prefer not to have to buy an impact driver, but I do need to buy a corded drill anyway to take off the rivets so perhaps I can justify the cost to upgrade to an impact capable version! :mrgreen:
-
oldgravy
- Captain Crunch
- Posts: 268
- Joined: Tue Aug 20, 2013 9:37 am
- Location: Surrey / Langley
- Contact:
Re: 1960 SII 109 Teardown
Victory was mine!
http://i1377.photobucket.com/albums/ah4 ... zikoab.jpg
Managed to get the screws out with a manual impact driver. Had to hit it pretty hard, but it worked! Then, the drums came off (boy, were they stuck) by putting the screws in the other threaded hole which pushes on the hub. Thereafter, a big pry bar levered against the backplates got them off. Nice!
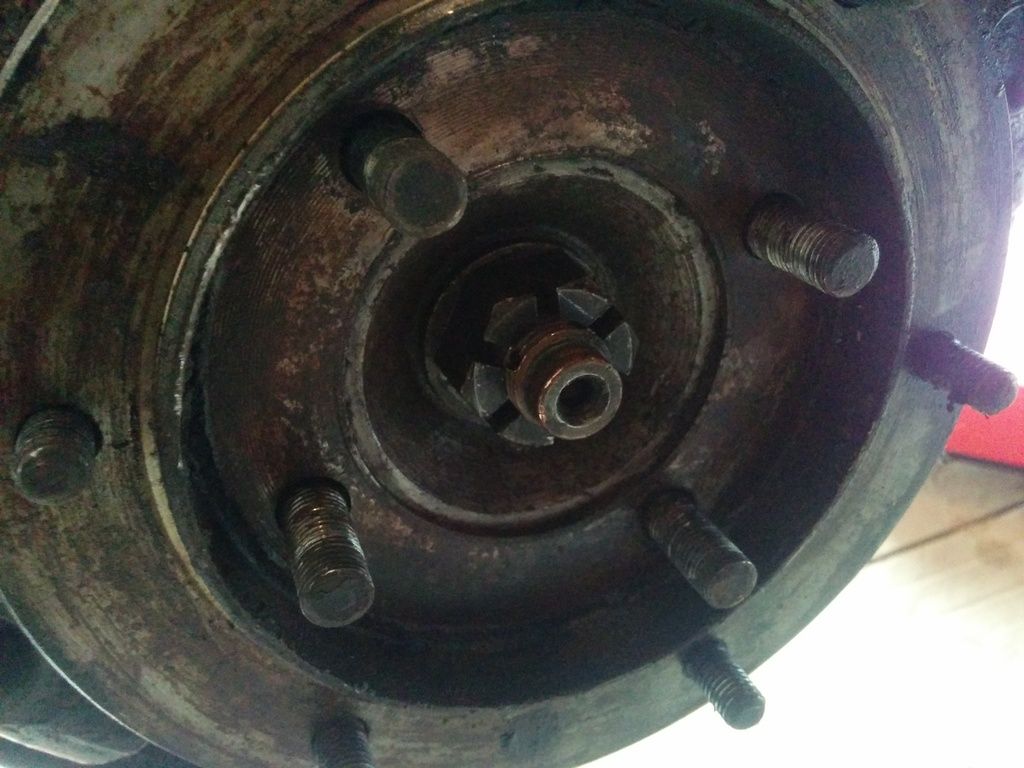
Now I'm stuck here:
http://i1377.photobucket.com/albums/ah4 ... bw7ttz.jpg
This is the rear output flange off the t-case. The 1" castle nut on the thread in the centre of the photo is on there but good, and I'm having a hell of a time turning it. I've tried:
- Using the newly purchased impact driver: Nope.
- Bracing the transmission brake drum bolts against the concrete floor with a piece of 2x4 and turning on the nut with a socket and a breaker bar. This only lifted the rear of the chassis off the ground. Hmm.
I may have to heat it and try the breaker bar again, but the bolts are digging deeply into the wood so I may not be able to shift the nut.
http://i1377.photobucket.com/albums/ah4 ... zikoab.jpg
Managed to get the screws out with a manual impact driver. Had to hit it pretty hard, but it worked! Then, the drums came off (boy, were they stuck) by putting the screws in the other threaded hole which pushes on the hub. Thereafter, a big pry bar levered against the backplates got them off. Nice!
Now I'm stuck here:
http://i1377.photobucket.com/albums/ah4 ... bw7ttz.jpg
This is the rear output flange off the t-case. The 1" castle nut on the thread in the centre of the photo is on there but good, and I'm having a hell of a time turning it. I've tried:
- Using the newly purchased impact driver: Nope.
- Bracing the transmission brake drum bolts against the concrete floor with a piece of 2x4 and turning on the nut with a socket and a breaker bar. This only lifted the rear of the chassis off the ground. Hmm.
I may have to heat it and try the breaker bar again, but the bolts are digging deeply into the wood so I may not be able to shift the nut.
-
John Boy
Re: 1960 SII 109 Teardown
use a dill with a 1/8 bit, drill into each of the five slots toward the washer. then to a larger bit, do the same to all five slots. when the metal looks thin, use a chisel to snap the nut lose.
Then clean the threads and buy a new nut.
Cheers;
Johnny B
Then clean the threads and buy a new nut.
Cheers;
Johnny B